Nothing transforms a living room quite like a stunning fireplace wall that commands attention and creates the perfect focal point. We’ve all walked into spaces where the fireplace wall immediately draws us in – it’s that magnetic combination of warmth function and striking design that makes the entire room feel complete.
Whether you’re working with a traditional brick hearth or a sleek modern insert your fireplace wall offers endless possibilities for creative expression. From bold accent walls and floating mantels to built-in storage answers and dramatic stone treatments we’re seeing homeowners push boundaries to create truly personalized spaces.
The best part? You don’t need a complete renovation to achieve that designer look we all crave. With the right materials strategic lighting and clever styling tricks your fireplace wall can become the showstopping centerpiece that ties your entire living room together while boosting your home’s value.
Create a Classic Stone Accent Wall Around Your Fireplace
Stone accent walls bring timeless elegance to any living room fireplace, creating a stunning backdrop that never goes out of style. We’ll explore how natural stone transforms your fireplace wall into a sophisticated focal point that enhances your entire space.
Natural Stone Veneer Options
Limestone veneer offers a refined appearance with its smooth texture and neutral tones ranging from cream to light gray. We recommend limestone for modern and transitional living rooms where subtle sophistication matters most.
Travertine panels provide warmth through their honey and beige colorations while featuring distinctive natural pitting that adds character. These stones work exceptionally well in Mediterranean and rustic design schemes.
Slate veneer delivers dramatic impact with its rich charcoal and deep blue tones that create striking contrast against lighter furnishings. We often specify slate for contemporary spaces seeking bold visual statements.
Sandstone options bring earthy appeal through their varied textures and warm color palette including rust, tan, and golden hues. These natural materials complement traditional and farmhouse living room styles perfectly.
Quartzite veneers combine durability with stunning visual appeal, offering crystalline surfaces that catch and reflect firelight beautifully. We choose quartzite when clients want luxury materials that withstand high heat exposure.
Stacked Stone Installation Tips
Start with proper wall preparation by ensuring your fireplace wall is clean, level, and structurally sound before beginning installation. We always check for any moisture issues or electrical components that need addressing first.
Plan your stone layout by dry fitting pieces on the floor to create an attractive pattern that minimizes waste and maximizes visual appeal. Mixing different sized stones creates more natural looking results than uniform patterns.
Apply adhesive consistently using notched trowels to ensure even coverage and proper stone adhesion to your fireplace wall surface. We recommend starting from the bottom and working upward for best results.
Leave expansion gaps between stones to allow for natural movement and thermal expansion around your fireplace area. These small spaces prevent cracking and maintain your stone wall’s integrity over time.
Seal your installation with appropriate stone sealers to protect against moisture and staining while maintaining the natural appearance of your materials. We apply sealers after grouting is completely dry and cured.
Complementary Color Schemes
Warm neutrals like cream, beige, and soft taupe create cohesive looks when paired with limestone or sandstone fireplace walls. We pair these stones with warm white trim and rich wood furnishings for balanced appeal.
Cool grays complement slate and darker stone veneers beautifully, creating sophisticated monochromatic schemes that feel both modern and timeless. Silver accents and crisp white elements enhance these cooler palettes perfectly.
Earth tones including terracotta, sage green, and warm browns harmonize naturally with travertine and sandstone installations. We incorporate these colors through textiles, artwork, and decorative accessories for cohesive design flow.
Contrasting whites provide striking backdrops that make darker stone walls pop dramatically while keeping spaces feeling bright and open. Bright white mantels and surrounding trim create clean architectural lines that define your fireplace area.
Rich jewel tones like deep navy, forest green, or burgundy create luxurious atmospheres when balanced against neutral stone backgrounds. We use these colors sparingly through pillows, throws, and artwork to avoid overwhelming your stone focal point.
Build a Modern Shiplap Fireplace Feature Wall

Modern shiplap transforms your living room fireplace wall into a stunning focal point that balances rustic charm with contemporary elegance. This versatile wall treatment creates clean lines and adds texture without overwhelming the space.
Horizontal vs Vertical Shiplap Placement
Horizontal shiplap creates the classic farmhouse look that’s both timeless and iconic. This traditional layout works beautifully in cottage and farmhouse interiors where you want to establish an inviting atmosphere. The horizontal lines add crisp texture while maintaining the room’s cozy feel.
Vertical shiplap offers a modern approach that draws the eye upward and creates visual height. We recommend this placement for spaces with vaulted ceilings where you want to emphasize the room’s architectural features. This orientation makes standard ceiling heights appear taller and adds contemporary flair to your fireplace wall.
Paint Color Selection for Shiplap
White and off-white colors work best for shiplap fireplace walls because they provide a clean backdrop for your fireplace. These neutral tones complement various decorative styles from modern farmhouse to contemporary design. We’ve found that crisp white shiplap paired with a black fireplace creates striking contrast while maintaining sophistication.
Neutral paint colors ensure your shiplap wall remains versatile and timeless. Light grays and warm whites allow other design elements like your mantel and decor to shine while keeping the overall aesthetic cohesive.
Styling Around Shiplap Design
Contrasting elements create visual interest when balanced properly around your shiplap design. Pair white shiplap with a stained wood mantel and large format tile for a modern farmhouse style that feels fresh and current.
Rustic accents enhance the farmhouse appeal of horizontal shiplap installations. Reclaimed wood mantels and vintage accessories complement the texture while maintaining authenticity.
Modern touches elevate shiplap from purely rustic to contemporary chic. Black iron sconces and lush greenery introduce sleek elements that prevent the design from feeling too traditional.
Soft textiles and harmonious color schemes complete the styling around your shiplap fireplace wall. Layer throw pillows and blankets in coordinating colors to enhance the room’s overall aesthetic and create a welcoming atmosphere.
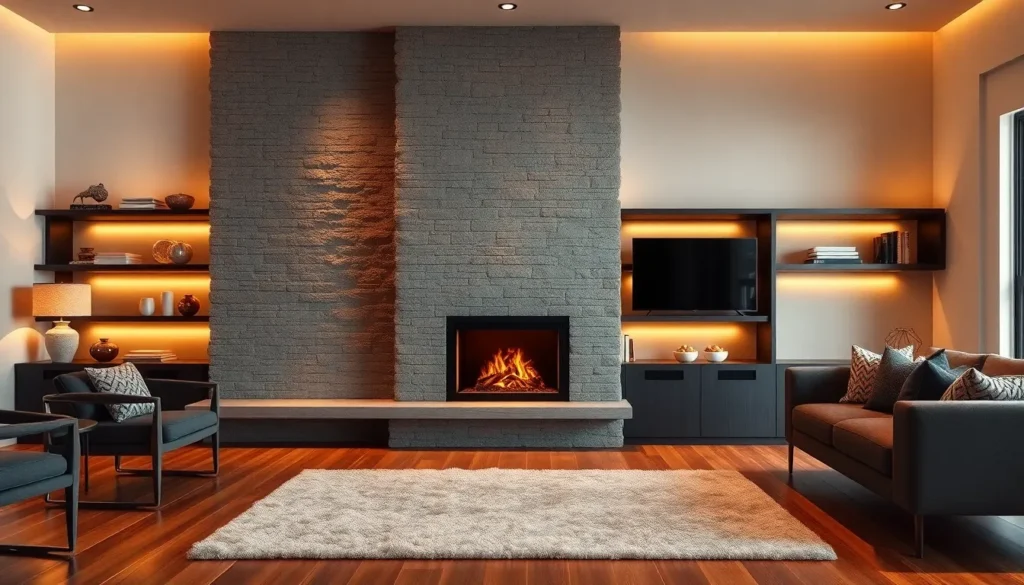
Design a Sophisticated Built-In Entertainment Center

Creating a built-in entertainment center around your fireplace transforms the wall into a cohesive focal point that seamlessly blends technology with traditional warmth. We’ll explore how custom shelving, smart cable answers, and thoughtful layouts can elevate your living room’s design and functionality.
Custom Shelving Integration
Built-in shelves flanking your fireplace maximize both storage and visual impact while maintaining architectural harmony. Wood shelving offers warmth and versatility, matching existing trim or creating contrast with darker stains. Stone shelves provide durability and complement natural fireplace materials like marble or granite. Metal shelving introduces industrial elements that work beautifully in contemporary spaces.
Open shelving creates an airy, spacious feel that prevents the wall from appearing heavy or overwhelming. Closed cabinets hide media equipment, gaming consoles, and everyday clutter for a streamlined appearance. Mixed configurations combine both approaches, using open shelves for display items and closed storage for functional needs.
Varying shelf heights and depths adds architectural interest that breaks up monotonous lines. Deep shelves accommodate larger items like sound systems or decorative bowls, while shallow shelves showcase books, photo frames, or small plants. Custom dimensions ensure every inch of space serves a purpose while maintaining visual balance.
Cable Management Answers
Hidden cable routing maintains the clean lines essential to sophisticated built-in designs. Recessed TV mounts with concealed conduit channels route wires behind the wall, eliminating visible cables that detract from the elegant appearance. Professional installation ensures proper depth for both the TV and cable management system.
Built-in grommets in shelves and cabinet backs provide organized pathways for power cords and HDMI cables. Routing cables through the back panels keeps them completely out of sight while maintaining easy access for future changes. Custom cabinet designs can incorporate dedicated equipment compartments with ventilation and cable access.
Wire management systems integrated during construction eliminate the need for surface-mounted answers that compromise the built-in aesthetic. Planning cable routes before installation ensures adequate space for current needs and future technology upgrades without visible modifications.
Symmetrical vs Asymmetrical Layouts
Symmetrical layouts create formal balance by placing identical shelving units on both sides of the fireplace and TV combination. This approach works particularly well in traditional and transitional designs where visual harmony supports the room’s established style. Matching shelf heights, depths, and spacing create a sense of order that feels intentional and polished.
Asymmetrical layouts introduce ever-changing visual interest through varied shelf arrangements and uneven spacing. One side might feature floor-to-ceiling storage while the other incorporates floating shelves at different heights. This contemporary approach suits modern and eclectic interiors where creative expression takes precedence over formal balance.
Layout choice depends on your room’s architecture and personal style preferences. High ceilings favor asymmetrical designs that can accommodate varying shelf heights without appearing cramped. Lower ceilings benefit from symmetrical arrangements that maintain horizontal emphasis and prevent the space from feeling top-heavy.
Install a Dramatic Floor-to-Ceiling Tile Wall

Creating a striking focal point becomes effortless when we install a floor-to-ceiling tile wall behind our fireplace. This dramatic approach transforms our living room into a sophisticated space that rivals designer showrooms.
Large Format Tile Options
Large format tiles deliver maximum visual impact with their expansive surfaces and minimal grout lines. Porcelain slabs measuring 24×48 inches or even 36×72 inches create an uninterrupted backdrop that makes our fireplace wall appear taller and more luxurious.
Marble tiles bring timeless elegance to our fireplace design while withstanding high temperatures without compromising their beauty. Carrara, Calacatta, and Statuario varieties offer distinct veining patterns that add natural artistry to our living space.
Ceramic large format options provide budget-friendly alternatives that mimic natural stone, wood, or concrete textures. These versatile tiles come in countless finishes, from matte to high-gloss, allowing us to achieve our desired aesthetic without breaking our renovation budget.
Natural stone slabs like limestone, travertine, or slate create authentic texture that complements both modern and traditional fireplace designs. Each slab features unique characteristics that make our fireplace wall truly one-of-a-kind.
Subway Tile Pattern Variations
Traditional subway tiles arranged in classic running bond patterns create clean, timeless appeal that works beautifully around our fireplace. Standard 3×6 inch dimensions provide familiar proportions that feel both classic and contemporary.
Herringbone patterns using subway tiles add sophisticated movement to our fireplace wall without overwhelming the space. This zigzag arrangement creates visual interest while maintaining the clean lines that subway tiles are known for.
Chevron installations take subway tiles in a bold direction, creating ever-changing V-shaped patterns that draw eyes upward toward our fireplace opening. This arrangement works particularly well with floor-to-ceiling installations.
Vertical stacking breaks traditional subway tile rules by running tiles in straight vertical columns instead of staggered rows. This modern approach emphasizes height and creates a completely different aesthetic than expected subway tile applications.
Mixed size combinations blend standard subway tiles with larger or smaller versions to create custom patterns unique to our space. Combining 2×4, 3×6, and 4×8 inch tiles allows endless creative possibilities.
Grout Color Considerations
Contrasting grout colors make our tile pattern the star of our fireplace wall design. Dark grout with light tiles creates bold definition, while light grout with dark tiles softens the overall appearance.
Matching grout selections create seamless, continuous surfaces that emphasize the tile material rather than the installation pattern. This approach works exceptionally well with large format tiles where we want uninterrupted visual flow.
Gray grout options offer the perfect middle ground between stark white and deep charcoal, complementing most tile colors while hiding everyday dirt and stains. Light gray, medium gray, and charcoal gray each create different moods in our living room.
Colored grout choices can tie our fireplace wall into our room’s color scheme by echoing accent colors found in our furniture, artwork, or textiles. Navy, sage green, or warm beige grout adds subtle personality to neutral tile selections.
Maintenance considerations should guide our grout color decisions since lighter colors show dirt more readily than darker alternatives. Choosing grout colors that complement our lifestyle ensures our fireplace wall maintains its beauty with minimal effort.
Incorporate Floating Shelves for Display and Storage

Floating shelves transform fireplace walls into functional display areas while maintaining the clean aesthetic we’ve established with our stone, shiplap, or tile treatments. These versatile additions provide essential storage without overwhelming the space and create perfect opportunities to showcase decorative objects, books, or personal collections.
Weight Distribution and Support
Proper anchoring forms the foundation of any successful floating shelf installation on fireplace walls. We must secure shelves directly into wall studs or use heavy duty wall anchors rated for the exact load requirements. Masonry walls surrounding fireplaces require specialized hardware like toggle bolts or masonry anchors designed for stone and brick surfaces.
Weight distribution becomes critical when displaying heavier items like books, ceramics, or metal decor pieces. We recommend consulting structural guidelines before installation to ensure long term safety and prevent sagging or collapse. Professional assessment helps determine the appropriate anchor spacing and weight limits for your exact wall construction.
Drywall installations need particular attention since the heat and moisture from fireplace use can affect anchor integrity over time. Using multiple anchor points spreads the load evenly and provides redundant support for peace of mind.
Seasonal Decorating Ideas
Seasonal transitions become effortless when we design floating shelves with flexibility in mind. Fall and winter decorating incorporates natural elements like pinecones, evergreen garlands, and warm toned candles that complement the fireplace’s cozy atmosphere. These organic materials pair beautifully with the stone or wood elements we’ve already established.
Spring and summer styling shifts toward lighter colors and minimalistic arrangements that refresh the entire wall composition. Fresh floral displays, lighter pottery, and airy decorative objects create visual breathing room during warmer months. We can achieve this transformation by simply swapping accessories rather than renovating the entire display structure.
Versatile mounting systems like removable hooks or adjustable brackets allow quick seasonal changes without damaging the wall surface. This approach maintains our fireplace wall’s year round appeal while accommodating different decorative themes and color palettes.
Mixed Material Combinations
Material mixing creates visual depth and connects floating shelves seamlessly with existing fireplace treatments. Wood shelves provide warmth and softness that balances the cool tones of marble or stone surrounds we’ve previously installed. Light oak or walnut shelving particularly complements the natural stone veneer options we discussed earlier.
Metal brackets introduce sleek, modern elements that work exceptionally well with contemporary tile installations. Black iron or brushed steel hardware creates striking contrast against white or neutral backgrounds while maintaining the sophisticated aesthetic we’ve built throughout the wall design.
Stone and wood combinations offer the most versatile approach for mixed material fireplace walls. Marble surrounds paired with horizontal wood shelving create contemporary elegance, while rustic stone with reclaimed wood brackets enhances the farmhouse charm of shiplap treatments. These material relationships reinforce our overall design narrative while adding functional display space that feels intentional and cohesive.
Add Reclaimed Wood Planks for Rustic Charm

Reclaimed wood planks bring authentic character to our fireplace walls while creating an inviting focal point that complements both traditional and contemporary design elements. These weathered materials add depth and texture that transforms the entire living space.
Weathered Wood Finish Options
Distressed finishes create the perfect aged appearance for reclaimed wood planks around our fireplace. We can achieve this look through sanding techniques that reveal underlying wood layers, creating natural wear patterns that mimic decades of use. Wire brushing enhances the wood grain texture while removing softer wood fibers, leaving behind beautiful raised grain patterns.
Vintage staining options include gray washes that highlight the wood’s natural patina, while darker stains like espresso or walnut create dramatic contrast against lighter wall colors. We recommend testing different stain combinations on sample pieces to achieve the desired weathered appearance. Chemical aging techniques using vinegar and steel wool answers can accelerate the natural oxidation process, creating authentic looking weathered surfaces in just hours.
Whitewashing techniques provide a lighter, more coastal feel to reclaimed wood installations. This finish allows the wood’s natural grain to show through while brightening the overall appearance, making it perfect for smaller living rooms where we want to maintain an open, airy feeling.
Horizontal Plank Installation
Horizontal placement creates clean lines that emphasize the width of our fireplace wall, making the entire area appear larger and more proportioned. We install these planks using a tongue and groove system or ship lap joints that create seamless connections between boards. Starting from the bottom and working upward ensures proper alignment and prevents gaps that could collect dust or debris.
Modern installation techniques include floating the planks slightly away from the wall using furring strips, creating subtle shadow lines that add depth to the design. We space the planks with consistent gaps of 1/8 to 1/4 inch to accommodate natural wood movement while maintaining the clean aesthetic. Hidden fastener systems keep nail holes invisible, preserving the smooth surface appearance.
Wall preparation steps require checking for level surfaces and installing appropriate backing materials. We use moisture barriers behind wood installations near fireplaces to prevent heat damage and ensure longevity of the reclaimed materials.
Balancing Rustic with Modern Elements
Contemporary contrast elements work beautifully alongside reclaimed wood fireplace walls. We pair weathered wood with sleek metal accents like brushed steel fireplace screens or minimalist light fixtures that highlight the texture differences. Clean lined furniture in neutral colors allows the rustic wood to remain the focal point while maintaining overall design balance.
Material mixing strategies include incorporating marble or stone fireplace surrounds that provide sophisticated contrast to the rough wood textures. We choose materials with smooth, polished surfaces that complement rather than compete with the reclaimed wood’s natural imperfections. Glass elements like modern fire screens or contemporary art pieces create visual breathing space within the rustic design.
Technology integration becomes seamless when we mount flat screen TVs above wood plank installations using low profile brackets that keep cables hidden within the wood framework. We plan wire routing during the plank installation process, creating channels that accommodate HDMI cables and power cords without disrupting the rustic aesthetic.
Color coordination maintains harmony between rustic and modern elements through careful paint selection for surrounding walls. We choose neutral tones like soft grays or warm whites that allow both the reclaimed wood and contemporary furnishings to shine without creating visual competition.
Paint an Eye-Catching Accent Wall Behind the Fireplace

Transforming your fireplace wall with paint offers one of the most budget-friendly ways to create a stunning focal point. Bold colors and creative techniques can completely reimagine your living space without the expense of structural changes.
Bold Color Selection Guidelines
Choose colors that complement your existing room palette while creating enough contrast to make the fireplace wall stand out. Deep red, rich blue, and charcoal gray work exceptionally well as accent colors behind fireplaces because they enhance the warmth and drama of the fire itself.
Consider your room’s lighting conditions when selecting paint colors, as natural and artificial light can dramatically affect how colors appear throughout the day. Rooms with limited natural light benefit from warmer accent colors like burgundy or forest green, while well-lit spaces can handle cooler tones like navy blue or deep purple.
Test paint samples directly on your fireplace wall before committing to a full application, since the texture and materials surrounding your fireplace can influence how colors look. We recommend painting large sample squares and observing them at different times of day to ensure you’re happy with your choice.
Match your color intensity to your room’s overall energy level, selecting bolder, more saturated hues for contemporary spaces and softer, muted versions of the same colors for traditional or transitional rooms.
Two-Tone Paint Techniques
Apply a darker shade directly behind the fireplace and extend a lighter, complementary color to the surrounding wall areas to create visual depth and interest. This technique works particularly well when the darker color covers the entire chimney breast from floor to ceiling.
Create horizontal color blocking by painting the lower two-thirds of the fireplace wall in a deeper tone and the upper portion in a lighter shade, which can make rooms with standard ceiling heights feel more spacious.
Use the 60-30-10 color rule when implementing two-tone techniques, with your dominant room color covering 60% of the space, your secondary color taking up 30%, and your accent fireplace color representing the bold 10%.
Experiment with ombre effects by blending two related colors from dark to light, starting with the deepest shade at the bottom of the wall and gradually transitioning to the lighter tone near the ceiling.
Textured Paint Applications
Apply textured paint using techniques like sponging, rag rolling, or brush stippling to add dimension and visual interest to your fireplace accent wall. These methods create subtle variations in color depth that make the wall appear more ever-changing under firelight.
Consider faux finishing techniques such as color washing or dry brushing to achieve the look of aged plaster or weathered stone without the expense of actual materials. Venetian plaster techniques can create particularly elegant results that complement both traditional and modern fireplace designs.
Use textured rollers or specialty brushes to create consistent patterns across your accent wall, ensuring even coverage while maintaining the desired texture throughout the entire surface.
Build up texture gradually with multiple thin coats rather than attempting to achieve your desired effect in a single application, which allows for better control and more professional-looking results.
Install Elegant Wainscoting Around the Fireplace Area

Wainscoting transforms an ordinary fireplace wall into an architectural masterpiece that frames your hearth with sophisticated detail. We’ll explore how this classic design element creates a polished focal point while adding depth and visual interest to your living room.
Traditional Panel Styles
Raised panel wainscoting delivers the most formal and elegant appearance for your fireplace wall. These panels create shadows and depth that enhance the architectural character of your living room while providing a timeless backdrop for your hearth. Traditional raised panels work particularly well in homes with classic or colonial styling.
Flat panel designs offer a sleeker modern interpretation that still maintains traditional appeal. We recommend this style when you want clean lines without sacrificing the sophisticated look that wainscoting provides. Flat panels complement both contemporary and transitional fireplace designs while creating a streamlined aesthetic.
Shaker style panels strike the perfect balance between simplicity and craftsmanship for fireplace walls. Their recessed center panels and clean frame construction add visual texture without overwhelming the space. Shaker wainscoting works beautifully with farmhouse mantels and creates a relaxed yet refined atmosphere around your fireplace.
Height and Proportion Guidelines
Standard wainscoting height ranges from 30 to 36 inches for most living room fireplace installations. We typically install panels at one third of the wall height to create proper visual proportion. Rooms with 9 foot ceilings accommodate 36 inch wainscoting beautifully while 8 foot ceilings look best with 30 inch panels.
Fireplace surround proportions must complement your wainscoting height for a cohesive design. Large fireplaces require taller wainscoting panels to maintain visual balance throughout the wall composition. Smaller hearths benefit from standard height panels that don’t compete with the fireplace opening.
Room scale determines the appropriate wainscoting proportions for your fireplace wall. Spacious living rooms can handle taller panels and more substantial molding profiles without appearing overwhelming. Compact spaces require streamlined wainscoting designs that enhance rather than dominate the fireplace area.
Crown Molding Integration
Crown molding creates a seamless transition between your wainscoted fireplace wall and ceiling. We install crown molding at the top of wainscoting panels to provide a finished appearance that reinforces the fireplace as your room’s design anchor. Proper crown molding selection ensures your wainscoting looks intentional and professionally installed.
Matching crown molding profiles throughout the room creates visual continuity with your fireplace wall treatment. Alternatively we can select contrasting molding styles that complement your wainscoting while adding visual interest to the space. The crown molding scale should correspond to your room size and ceiling height for optimal proportion.
Professional installation ensures your crown molding aligns perfectly with existing architectural elements. We recommend hiring experienced carpenters for complex crown molding work especially when integrating with existing fireplace mantels. Proper crown molding installation completes the wainscoting design and creates a unified appearance throughout your living room.
Create a Gallery Wall Above the Fireplace Mantel

We can transform the space above our fireplace into a captivating gallery wall that adds personality and visual interest to the entire room. This approach works beautifully with any fireplace treatment we’ve chosen, from stone accents to shiplap designs.
Artwork Size and Spacing Rules
Mixing large and small pieces creates the most visually compelling gallery walls above fireplaces. Large artwork serves as our focal point, typically measuring 16×20 inches or larger, while smaller pieces fill gaps and add detail throughout the arrangement. We should aim for our largest piece to occupy roughly one third of the total wall space above the mantel.
Spacing between frames requires careful consideration to achieve professional results. The standard rule calls for 2 to 3 inches between each frame, though we can adjust this based on our artwork sizes and available wall space. Smaller pieces benefit from tighter spacing of 1.5 to 2 inches, while larger works need 3 to 4 inches to breathe properly.
Planning our layout on the floor before hanging prevents costly mistakes and ensures balanced composition. We can arrange all pieces on a large surface, experimenting with different configurations until we find the perfect balance. This method allows us to visualize how colors, sizes, and shapes work together before committing to nail holes in our wall.
Frame Style Coordination
Unified frame themes create cohesive gallery walls that complement our fireplace wall design. Traditional rooms benefit from matching wood frames in warm tones like walnut or cherry, while modern spaces shine with sleek black or white frames. Rustic settings call for distressed wood or metal frames that echo the textures we’ve incorporated elsewhere.
Mixing frame styles adds visual interest when done thoughtfully and with intention. We can combine different materials like wood and metal, or vary frame widths from thin to thick, as long as we maintain some unifying element. Color consistency often serves as this connecting thread, allowing us to mix materials while keeping the overall look harmonious.
Frame colors should either blend seamlessly with our fireplace treatment or provide deliberate contrast. Light colored frames work beautifully against dark stone or brick fireplaces, while dark frames create striking contrast against white shiplap or painted walls. We can also choose frames that pick up accent colors from our room’s existing palette.
Lighting Considerations for Art Display
Track lighting offers the most flexibility for highlighting exact pieces in our gallery wall arrangement. We can position adjustable spotlights to illuminate our largest or most important artworks, creating dramatic focal points that draw the eye upward from the fireplace. This lighting method works particularly well with high ceilings and allows us to change the emphasis as we rotate our artwork.
LED strip lighting creates a modern glow that transforms our gallery wall into a sophisticated display. Installing LED strips behind our frames produces an ambient backlighting effect that makes the entire arrangement appear to float above the mantel. This technique works especially well in contemporary settings and can be dimmed to create different moods throughout the day.
Picture lights mounted directly on frames provide traditional elegance and focused illumination. These small fixtures attach to individual pieces, offering precise lighting that enhances colors and details in our artwork. We should choose brass or bronze finishes for traditional rooms, while brushed nickel or black work better in modern spaces that complement our fireplace design.
Conclusion
We’ve explored countless ways to transform your fireplace wall from ordinary to extraordinary. Whether you’re drawn to the rustic charm of reclaimed wood the sophisticated elegance of natural stone or the clean lines of modern shiplap each approach offers unique opportunities to create your perfect living space.
The beauty of these fireplace wall ideas lies in their flexibility. You can achieve stunning results with simple paint techniques on a tight budget or invest in dramatic floor-to-ceiling installations for maximum impact. From built-in entertainment centers to floating shelves and gallery walls there’s a solution that matches your style and functional needs.
Your fireplace wall doesn’t just warm your home—it defines your living room’s character. With the right combination of materials colors and styling elements you’ll create a focal point that reflects your personality while adding lasting value to your space.
Frequently Asked Questions
What are the most popular materials for fireplace wall makeovers?
The most popular materials include natural stone veneer (limestone, travertine, slate), modern shiplap, reclaimed wood planks, large format tiles, and traditional brick. Each material offers unique aesthetic benefits, from rustic charm to contemporary elegance, allowing homeowners to create their desired style while serving as a captivating focal point.
How much does it cost to renovate a fireplace wall?
Fireplace wall renovation costs vary significantly based on materials and scope. Budget-friendly options like paint start around $50-200, while shiplap ranges from $500-1,500. Mid-range stone veneer costs $1,000-3,000, and high-end custom built-ins can exceed $5,000. Many designer looks can be achieved without full renovation using strategic styling and materials.
Can I install a fireplace wall treatment myself?
Many fireplace wall treatments are DIY-friendly, including shiplap installation, painting, and floating shelf mounting. However, natural stone veneer, built-in entertainment centers, and electrical work typically require professional installation for safety and optimal results. Always check local building codes and consider your skill level before starting.
What colors work best with stone fireplace walls?
Stone fireplace walls pair beautifully with warm neutrals (beiges, creams), cool grays, earth tones (browns, taupes), contrasting whites for drama, and rich jewel tones (deep blues, emerald greens). The key is selecting colors that complement the stone’s natural undertones while creating the desired mood for your living space.
How do I choose between horizontal and vertical shiplap?
Horizontal shiplap creates a classic farmhouse look that feels cozy and traditional. Vertical shiplap draws the eye upward, making rooms with vaulted ceilings appear taller and more dramatic. Consider your room’s proportions, ceiling height, and desired aesthetic when choosing the orientation for your fireplace wall.
What’s the best way to hide TV cables in a fireplace entertainment center?
Effective cable management includes hidden routing through walls, using cord concealers behind the TV, installing outlet boxes at appropriate heights, and planning cable pathways during construction. Professional installation ensures clean lines and proper electrical safety. Consider wireless options and streaming devices to minimize visible cables.
How do I create a balanced gallery wall above my fireplace?
Start by planning your layout on the floor, mixing large and small pieces for visual interest. Maintain 2-3 inches between frames, keep artwork 6-8 inches above the mantel, and ensure the total width doesn’t exceed the mantel’s width. Use a unified frame theme or thoughtfully mix styles for cohesion.
What type of lighting works best for fireplace walls?
Effective fireplace wall lighting includes ambient lighting from ceiling fixtures, accent lighting like wall sconces flanking the fireplace, and task lighting such as LED strips for built-ins or picture lights for artwork. Layer different light sources to create depth and highlight your fireplace wall’s features throughout the day.
How do I maintain natural stone fireplace walls?
Natural stone requires regular dusting, prompt spill cleanup, and periodic sealing (every 1-2 years) to prevent staining. Use pH-neutral cleaners specifically designed for stone, avoid acidic products, and address any cracks or loose stones immediately. Different stone types have specific care requirements, so research your particular material.
Can floating shelves support heavy decorative items?
Yes, with proper installation. Use heavy-duty brackets rated for your intended weight, locate wall studs for secure mounting, and distribute weight evenly across shelves. For masonry walls, use appropriate anchors and consider professional installation. Most properly installed floating shelves can support 20-50 pounds depending on size and mounting method.