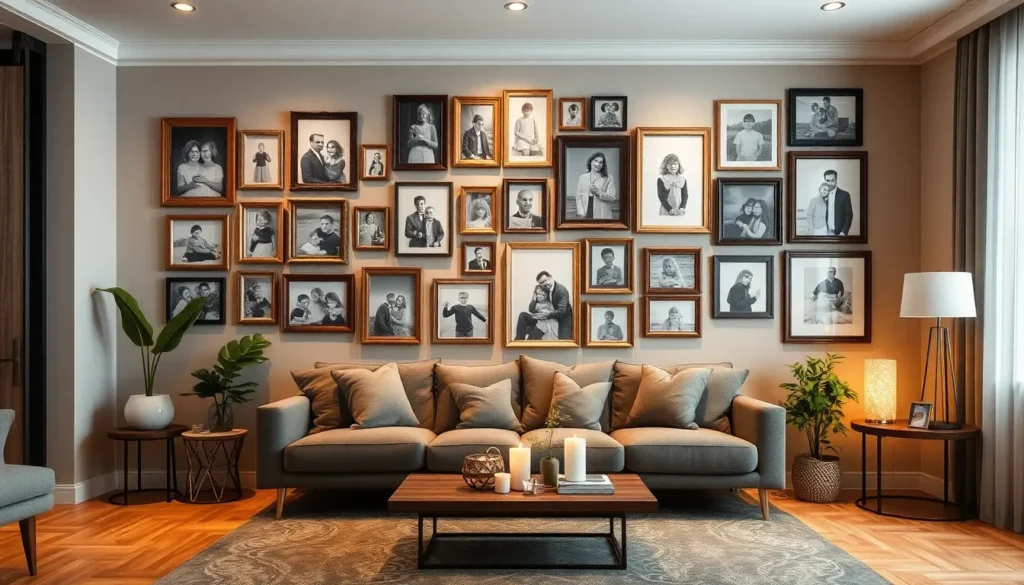
Transform your living room into a heartwarming showcase of cherished memories with stunning family picture wall displays that’ll make every guest stop and smile. We’ve all walked into homes where bare walls felt cold and impersonal – but a thoughtfully designed photo gallery wall changes everything.
Creating the perfect family picture wall isn’t just about hanging frames randomly on your living room wall. It’s about crafting a visual story that reflects your family’s journey while improving your home’s overall aesthetic. From classic gallery walls to modern geometric arrangements, we’ll show you how to turn those precious family moments into stunning focal points.
Whether you’re working with a small accent wall or a grand living room space, we’ve got creative answers that’ll help you display your favorite family photos with style and confidence.
Create a Gallery Wall With Mixed Frame Sizes and Styles
A gallery wall with varied frame sizes creates visual interest and prevents your family picture display from looking too uniform. We’ll explore how mixing different frame elements transforms a simple photo collection into a ever-changing focal point.
Choose Frames in Complementary Colors
Select frames that share a common color family to maintain cohesion across your gallery wall. We recommend choosing 2-3 colors maximum, such as white, natural wood, and black for a classic combination. Warm tones like gold, brass, and wood create an inviting atmosphere, while cool tones including silver, gray, and white offer a modern aesthetic.
Consider your living room’s existing color palette when making frame selections. Neutral frames work well in most spaces, but bold colors can add personality if they complement your decor. We suggest using one dominant color for 60% of your frames, with accent colors filling the remaining 40%.
Test color combinations by laying frames on the floor before hanging them. This approach helps you visualize how colors interact and ensures balanced distribution across your wall space.
Mix Square and Rectangular Orientations
Combine portrait and industry orientations to create a ever-changing arrangement that captures attention. We find that mixing 8×10, 5×7, and 11×14 sizes creates the most visually appealing compositions. Square frames add geometric interest and work particularly well for Instagram-style photos or children’s artwork.
Place larger rectangular frames as anchor points in your gallery wall design. These substantial pieces ground the arrangement and provide visual weight that smaller frames can orbit around. We typically position one large frame slightly off-center to create asymmetrical balance.
Fill gaps with smaller square frames to complete your composition. These pieces serve as visual bridges between larger elements and help create a cohesive flow across your wall.
Include Different Frame Materials
Incorporate wood frames to add warmth and texture to your family picture wall. Natural wood grains bring organic elements into your living space and pair beautifully with both rustic and contemporary decor styles. We recommend oak, walnut, or pine for their durability and classic appeal.
Add metal frames for contemporary sophistication and clean lines. Brushed gold, matte black, and silver finishes offer different moods while maintaining a modern aesthetic. These materials reflect light beautifully and create subtle focal points within your arrangement.
Consider acrylic or floating frames for a minimalist approach that lets your photos take center stage. These transparent options create the illusion that pictures are floating on your wall, adding depth without visual weight. We particularly love this style for black and white family portraits or artistic photography.
Design a Symmetrical Grid Layout for Clean Organization

Creating a symmetrical grid layout offers a refreshing contrast to mixed arrangements, emphasizing order and visual harmony. This approach works exceptionally well for family picture walls where we want to showcase memories with structured elegance.
Plan Your Grid Before Hanging
Measuring the available wall space marks our first essential step toward achieving perfect symmetry. We should outline the desired grid size directly on the wall using painter’s tape or digital planning tools to visualize the final result before making any holes.
Deciding on the number of rows and columns depends entirely on our photo collection size and available wall dimensions. Common configurations like 3×3, 4×4, or 2×4 grids provide excellent starting points, though we can customize based on our exact space requirements and family photo collection.
| Grid Configuration | Best For |
|---|---|
| 3×3 Grid | Medium walls, 9 family photos |
| 4×4 Grid | Large walls, extensive collections |
| 2×4 Grid | Narrow walls, horizontal layouts |
Use Consistent Spacing Between Photos
Maintaining uniform spacing between each frame creates the cohesive look that makes symmetrical grids so visually appealing. Standard spacing typically ranges from 2 to 3 inches between the edges of each frame, preventing the gallery from appearing crowded or uneven.
Measuring the spacing precisely ensures our grid maintains its clean, organized appearance throughout the entire display. We can use a ruler or spacing template to guarantee consistency across all frame placements, creating that professional gallery effect we’re aiming for.
Select Uniform Frame Sizes
Choosing frames of identical size and style streamlines the overall effect and highlights the symmetrical structure we’re creating. This approach proves especially effective with grid layouts because it emphasizes the ordered arrangement rather than individual frame variations.
Black, white, or gold frames remain popular choices for achieving either classic or modern aesthetics in our living rooms. Alternatively, we can use matching photo ledges that allow easy swapping of images without needing to rehang frames as our family collection grows and changes over time.
Incorporate Floating Shelves for Dynamic Display Options

Floating shelves transform family picture walls into flexible galleries that evolve with our changing memories. We can combine frames with other decorative elements while maintaining easy access for updates and rearrangements.
Layer Photos at Different Depths
Layering creates visual depth that makes our family picture wall more captivating and dimensional. We position larger frames behind smaller ones to establish different planes of focus throughout the display. Stand back frames work perfectly for creating this layered effect without requiring wall mounting for every piece.
Varying frame positions prevents our gallery from looking flat against the wall. We lean some photos directly on shelves while propping others behind them at slight angles. This technique adds movement to the arrangement and draws viewers’ eyes across the entire display rather than to single focal points.
Different sized frames naturally create layering opportunities when we arrange them thoughtfully. We place 8×10 frames as background anchors then position 5×7 and 4×6 photos in front for a cascading effect that showcases multiple family memories simultaneously.
Add Small Decorative Elements
Small decorative items balance photo displays and prevent picture walls from overwhelming the living room space. We integrate candles vases plants and small sculptures between framed family photos to create breathing room and visual interest. These elements complement rather than compete with our cherished family memories.
Decorative objects add texture and dimension that pure photo arrangements often lack. We choose items that reflect our family’s personality and style preferences while maintaining appropriate scale for shelf displays. Small potted succulents books or ceramic pieces work exceptionally well alongside family photographs.
Strategic placement of decorative elements guides viewers through our family picture wall naturally. We position these items to create visual stepping stones between photo groupings while maintaining overall cohesion across the entire display area.
Easily Swap Out Seasonal Pictures
Seasonal photo swapping keeps our family picture wall fresh and relevant throughout the year. We use clip frames and picture ledges that allow quick photo changes without removing wall hardware or disrupting the overall arrangement. This flexibility lets us highlight different family moments as seasons change.
Simple release mechanisms make updating displays effortless for busy families. We choose frames with easy open backs or magnetic closures that accommodate new photos in seconds rather than minutes. Picture ledges eliminate the need for precise hanging while supporting various frame sizes simultaneously.
Themed seasonal displays celebrate holidays family milestones and changing preferences naturally. We rotate summer vacation photos with holiday memories or milestone celebrations to keep our living room gallery current and meaningful for family members and guests alike.
Build a Timeline Wall Showcasing Family Milestones

Creating a timeline wall transforms your living room into a visual narrative that tells your family’s unique story over the years. This chronological approach turns random photo placement into a meaningful journey that guests can follow from one milestone to the next.
Arrange Photos Chronologically
Start with your earliest family photos and work forward through time to create a compelling visual story. We recommend beginning with birth announcements on the left side of your wall and progressing toward current family photos on the right. This left to right flow feels natural for viewers and creates an captivating narrative experience.
Position childhood milestone photos like first steps, birthdays, and school pictures in the early section of your timeline. Follow these with teenage achievements such as graduations, sports victories, and special celebrations. Adult milestones including engagements, career achievements, and new family additions complete the chronological sequence.
Maintain consistent spacing between each time period to help viewers understand the progression. We suggest using 4 to 6 inch gaps between different life stages while keeping photos within each period closer together with 2 to 3 inch spacing.
Include Birth Announcements and Wedding Photos
Birth announcements serve as perfect starting points for your family timeline wall and add sentimental value to the display. Frame these special keepsakes alongside newborn photos to create emotional anchor points that mark new chapters in your family story. Hospital bracelets, first footprints, and announcement cards work beautifully when matted together in larger frames.
Wedding photos deserve prominent placement as they represent the foundation of your family unit. Choose 2 to 3 wedding images that capture different moments like the ceremony, reception, and intimate portraits. We recommend using slightly larger frames for wedding photos to emphasize their importance in your family timeline.
Position these milestone markers at natural transition points in your chronological flow. Birth announcements can introduce new family members while wedding photos mark the beginning of your shared journey together.
Add Achievement Certificates and Awards
Achievement certificates and awards add depth to your timeline wall by showcasing accomplishments alongside traditional photos. Frame graduation diplomas, sports awards, and professional certifications to highlight personal growth and family pride. These documents tell stories that photos alone cannot capture.
Mix framed certificates with related achievement photos for maximum impact. Display a graduation certificate next to the graduation day photo or position a sports award near team pictures. This pairing creates context and reinforces the significance of each milestone.
We suggest using uniform matting and frames for certificates to maintain visual consistency across your timeline. White or cream matting works well for most documents while black or dark wood frames provide professional contrast that complements family photos throughout your display.
Combine Family Photos With Personal Artwork and Memorabilia

Blending family photos with other meaningful pieces creates a more ever-changing and personalized gallery wall that tells your complete family story. We can transform our living room display by incorporating various elements that reflect our family’s creativity, adventures, and values alongside our cherished photographs.
Include Children’s Artwork
Children’s artwork adds a playful and deeply personal touch to our family gallery wall that celebrates creativity within our home. We should select our kids’ best drawings, paintings, and school projects to display alongside family photos in coordinating frames. Rotating these pieces seasonally keeps the display fresh while honoring our children’s artistic development over time.
Organizing children’s art in an organic pattern prevents the wall from looking too structured while maintaining visual interest. We can use smaller frames for individual drawings and larger frames for special projects like handprint crafts or collaborative family art pieces. Matting colorful artwork in neutral tones helps integrate these vibrant pieces with our family photos seamlessly.
Display Travel Souvenirs
Travel souvenirs transform our family photo wall into a visual journey that showcases adventures and creates conversation starters for guests. We can incorporate postcards, maps, ticket stubs, and small cultural artifacts alongside photos from our family trips. Shadow boxes work perfectly for displaying three dimensional items like shells from beach vacations or pressed flowers from hiking adventures.
Creating themed sections for different destinations helps organize our travel memorabilia while maintaining visual flow with our family photos. We should frame vintage maps of places we’ve visited and layer them behind photos from those exact trips. Small shelves integrated into our gallery wall can hold lightweight souvenirs like miniature landmarks or cultural crafts we’ve collected during our travels.
Add Inspirational Quotes or Family Mottos
Typography prints featuring inspirational quotes or family mottos create a cohesive theme that reinforces our family values throughout the living room display. We can select quotes that resonate with our family’s beliefs and complement the stories told through our photographs. Custom prints featuring our family name, established date, or personal motto add a unique touch that can’t be found in stores.
Varying the size and style of typography prints creates visual interest while maintaining readability from different viewing distances. We should choose fonts that match our overall decor style and use colors that coordinate with our existing frame palette. Positioning inspirational text strategically between photo clusters helps break up the visual weight while reinforcing the emotional impact of our family gallery wall.
Create a Black and White Theme for Timeless Elegance

Black and white family picture walls offer a sophisticated approach that never goes out of style. This classic color scheme transforms your living room gallery into an elegant focal point that complements any decor style.
Convert Color Photos to Monochrome
Converting your family photos to black and white creates instant cohesion across your entire display. Photo editing software makes this transformation simple, allowing you to adjust contrast and brightness for optimal visual impact. Professional printing services can also handle this conversion when you’re ordering prints directly.
Digital conversion gives you complete control over the final appearance of each image. We recommend adjusting the contrast slightly higher than normal to ensure your photos maintain visual interest without color. Batch processing multiple photos ensures consistent tones throughout your collection.
Online photo editing tools offer free conversion options if you prefer a quick solution. Many of these platforms include preset filters specifically designed for family portraits. Testing different conversion styles helps you find the perfect monochrome look for your space.
Use Matching Black or White Frames
Matching frames in either black or white maintain the minimalist aesthetic essential to this design approach. Black frames create dramatic contrast against light colored walls, while white frames offer a softer, more subtle appearance. Consistent frame colors keep the focus on your cherished family memories rather than the display hardware.
Standard frame sizes work best for creating uniform spacing across your wall arrangement. We suggest choosing frames with similar profiles and widths to maintain visual consistency. Matte finishes on frames reduce glare and create a more sophisticated appearance than glossy alternatives.
Budget conscious families can achieve this look by purchasing frames in bulk from home improvement stores. Many retailers offer matching sets specifically designed for gallery walls. Spray painting existing frames ensures perfect color matching if you’re working with frames you already own.
Add Texture With Different Photo Finishes
Different photo finishes add visual depth to your monochrome display without introducing color distractions. Matte finishes provide a soft, elegant appearance that reduces glare from room lighting. Glossy finishes create more dramatic contrast and make darker areas of photos appear deeper.
Mixing matte and glossy finishes strategically throughout your arrangement creates subtle texture variations. We recommend using glossy finishes for photos with strong contrast elements and matte finishes for softer portrait shots. This combination prevents your display from appearing flat or monotonous.
Canvas prints offer another texture option that works beautifully in black and white displays. The canvas texture adds organic warmth to the clinical precision of monochrome photography. Alternating between traditional photo prints and canvas creates an captivating tactile element that invites closer inspection from guests.
Design an Asymmetrical Layout for Modern Appeal

Asymmetrical arrangements offer a fresh alternative to traditional grid displays while maintaining visual balance through strategic placement. This approach creates ever-changing movement that draws the eye naturally across your family picture wall.
Start With Your Largest Photo as Anchor
Choose your most impactful family photo to serve as the central focal point of your entire display. We recommend selecting an image that measures at least 16×20 inches to create substantial visual weight on your living room wall. Position this anchor piece slightly off center rather than directly in the middle to establish the asymmetrical foundation.
Consider using a canvas print or a statement frame for your anchor photo to maximize its impact. Wedding portraits, large family gatherings, or professional family photos work exceptionally well as anchor pieces since they naturally command attention. Place your chosen anchor approximately one third from either the left or right edge of your designated wall space to follow the rule of thirds principle.
Build Outward With Smaller Images
Arrange smaller photos in clusters around your anchor piece to create natural visual flow throughout the display. Start with medium sized frames ranging from 8×10 to 11×14 inches positioned near your anchor photo. We suggest placing these secondary images at varying distances from the central piece to avoid creating rigid patterns.
Layer additional smaller frames measuring 5×7 and 8×10 inches to fill gaps and create depth in your arrangement. Mix portrait and industry orientations to add visual interest while maintaining the organic feel of asymmetrical design. Consider incorporating square frames alongside rectangular ones to break up predictable patterns and enhance the modern aesthetic.
Group photos in odd numbered clusters of three or five pieces to create more visually appealing arrangements. Leave intentional white space between groupings to prevent the wall from feeling cluttered or overwhelming to viewers.
Balance Visual Weight Across the Wall
Distribute heavier visual elements evenly across your wall space to prevent any single area from dominating the entire display. We recommend using darker frames or larger photos to anchor different sections while lighter elements help create breathing room between focal points. Consider the visual weight of both frame colors and photo content when planning your layout.
Create balance by positioning a cluster of smaller photos opposite your main anchor to establish equilibrium. Use objects like small shelves with decorative items or incorporate artwork alongside family photos to add textural variety. Mix frame materials such as wood, metal, and acrylic to create layers of visual interest without overwhelming the space.
Step back frequently during installation to assess how your arrangement feels from a viewing distance of 6 to 8 feet. Adjust positioning as needed to ensure no single corner or section draws excessive attention away from the overall family story you’re telling through your living room gallery wall.
Utilize Corner Spaces for Intimate Family Displays

Corner spaces often become overlooked areas in living room design, yet they offer unique opportunities for creating intimate family photo displays. We can transform these underutilized angles into meaningful focal points that draw visitors into our cherished memories.
Maximize Unused Wall Areas
Adjacent spaces like staircase walls and hallway entrances provide excellent extension opportunities for our family gallery walls. We can create seamless visual flow by carrying our photo collection beyond the main living room wall into these connecting areas.
Wall continuity becomes particularly effective when we extend displays around corners, allowing our family story to unfold naturally as guests move through the space. This technique works especially well in open floor plans where living rooms connect to other areas.
Vertical space above doorways and along staircase walls offers additional real estate for displaying family photos without overwhelming the main seating area. We can position smaller frames in these locations to maintain visual balance while maximizing our display area.
Create Cozy Reading Nook Galleries
Reading corner displays transform quiet spaces into warm, memory filled retreats where family photos provide comfort and connection. We can position a carefully curated selection of family images above a comfortable reading chair or small sofa to create an intimate atmosphere.
Photo placement at eye level while seated ensures optimal viewing angles for enjoying our family memories during quiet moments. This positioning strategy works particularly well with 8×10 and 11×14 frame sizes that provide sufficient visual impact without overwhelming the cozy space.
Lighting considerations become crucial in reading nooks, where we can incorporate small picture lights or nearby table lamps to illuminate our family photos while providing functional reading light. This dual purpose approach enhances both the photo display and the functionality of our reading space.
Use Corner-Exact Frame Arrangements
Corner clusters work best when we arrange frames in triangular or fan shaped patterns that follow the natural lines of the corner junction. We can start with one large anchor frame and build outward with progressively smaller pieces to create visual hierarchy.
Frame mixing becomes especially effective in corners where we can combine different sizes and shapes without worrying about perfect symmetry. Square frames paired with rectangular ones create ever-changing visual interest that draws the eye into the corner space.
Installation technique requires careful measuring from both wall surfaces to ensure our frames hang properly aligned with the corner angle. We can use painter’s tape to outline our arrangement before hanging, which helps visualize the final result and prevents installation mistakes in these tricky spaces.
Install Picture Ledges for Flexible Arrangement Options

Picture ledges offer a modern alternative to traditional wall-mounted frames while maintaining the visual impact we’ve achieved with our previous gallery wall techniques. We’ll transform our living room family displays into adaptable showcases that evolve with our growing photo collections.
Layer Multiple Photos on Each Shelf
Layering creates depth and visual interest in our family picture displays. We position larger frames at the back of each ledge and lean smaller photos in front to maximize our available space. This technique allows us to showcase more cherished memories within limited wall areas.
Multiple generations of family photos work beautifully when layered at different depths. We arrange wedding portraits behind graduation pictures or place baby photos in front of family vacation shots. The overlapping effect draws viewers closer to examine each treasured moment in our collection.
Canvas prints and framed photographs combine seamlessly when we vary their placement depths. We lean some frames directly against the wall while others rest slightly forward on the ledge surface. This creates natural shadows and dimension that enhance our living room’s overall aesthetic appeal.
Easily Rearrange Without New Nail Holes
Rearranging becomes effortless when our frames simply rest on ledges rather than hang from individual nails. We swap out seasonal photos throughout the year without creating additional holes in our walls. This flexibility proves especially valuable for renters or those who frequently update their home decor.
Holiday celebrations and special occasions inspire us to refresh our displays regularly. We rotate summer vacation photos with winter family gatherings or replace school portraits with recent achievement pictures. The ledge system accommodates these changes in minutes rather than hours.
Wall integrity remains intact as we experiment with different arrangements and compositions. We test various layouts until we find the perfect balance for our family story. The absence of permanent mounting hardware means we can relocate entire displays to different rooms when needed.
Mix Frame Sizes on Single Ledges
Frame variety adds visual dynamism to our ledge displays while maintaining cohesive family themes. We combine 5×7 portraits with 8×10 industry photos and smaller 4×6 snapshots on the same shelf. This mixing prevents monotonous arrangements that can appear too uniform or predictable.
Small frames fill gaps between larger pieces and create natural transitions across our ledge displays. We use wallet-sized photos of grandchildren alongside formal family portraits to tell complete stories. The size variation guides viewers’ eyes naturally from one section to another.
Standard frame dimensions work together harmoniously when we consider visual weight distribution. We balance one large 11×14 frame with several smaller pieces or pair two medium frames with multiple tiny ones. This approach ensures our ledge displays feel intentional rather than randomly assembled.
Incorporate Lighting to Highlight Your Family Memories

Strategic lighting transforms your carefully curated family picture wall into a stunning focal point that draws attention and creates ambiance throughout your living room.
Add Picture Lights Above Gallery Walls
Picture lights mounted directly above your gallery wall create focused illumination that showcases individual photos with professional precision. We recommend installing adjustable LED picture lights approximately 6-8 inches above each frame or grouping to eliminate shadows and provide even coverage across your display.
Traditional brass or brushed nickel picture lights complement both modern and classic frame styles while offering directional lighting that prevents glare on glass surfaces. Battery-powered picture lights eliminate the need for hardwiring and allow flexibility in placement without requiring electrical work.
Position these lights at a 30-degree angle to minimize reflections while maximizing visibility of your family memories. Dimmer switches enable you to adjust the intensity based on the time of day and create different moods for various occasions.
Use Track Lighting for Larger Displays
Track lighting systems provide versatile illumination for expansive family picture walls that span entire living room sections. We suggest installing adjustable track heads that can be repositioned as your photo collection grows or changes throughout the years.
LED track lighting offers energy efficiency while delivering bright, consistent light across multiple frame groupings without creating hot spots. Position track fixtures 24-30 inches from the wall to achieve optimal coverage and prevent harsh shadows behind frames.
Multiple track heads allow you to highlight different sections of your display independently, creating visual hierarchy and drawing attention to exact family milestones or seasonal updates. Remote-controlled track systems enable easy adjustment of individual lights without climbing ladders or disrupting other room activities.
Include Battery-Operated LED Strips
Battery-operated LED strips offer the easiest installation method for creating ambient lighting around your family picture wall without requiring electrical modifications. We recommend placing these flexible strips behind picture ledges or underneath floating shelves to create a warm glow that enhances the overall display.
Adhesive-backed LED strips attach directly to wall surfaces or frame backs, creating subtle backlighting that adds depth and visual interest to your gallery arrangement. Motion-activated strips conserve battery life while providing automatic illumination when family members or guests approach the display area.
Color-changing LED strips allow you to adjust the lighting tone from warm white for cozy evening ambiance to cool white for daytime viewing. Timer functions enable automatic operation that coordinates with your family’s daily routines and energy-saving preferences.
Conclusion
We’ve explored many ways to transform your living room with a thoughtfully designed family picture wall that truly reflects your unique story. From symmetrical grids to asymmetrical layouts and from black-and-white themes to colorful mixed displays we’ve covered options for every style preference and space constraint.
The key is choosing an approach that resonates with your family’s personality while considering your living room’s existing decor. Whether you opt for floating shelves that offer flexibility or create a timeline wall that chronicles your journey each method we’ve discussed can turn your blank wall into a meaningful focal point.
Remember that your family picture wall should grow and evolve just like your family does. With proper lighting and strategic placement you’ll create a warm inviting space that sparks conversations and brings joy to both family members and guests for years to come.
Frequently Asked Questions
What is the recommended spacing between frames on a family picture wall?
The ideal spacing between frames is 2 to 3 inches. This distance creates a cohesive look while preventing the display from appearing cluttered. Consistent spacing is especially important for grid layouts and helps maintain visual balance across your entire gallery wall.
How many frame colors should I use for a cohesive gallery wall?
Limit your frame colors to a maximum of 2-3 colors to maintain visual cohesion. Popular combinations include black and white, gold and white, or wood tones with black. Test color combinations before hanging to ensure they complement your room’s decor and create the desired aesthetic.
What’s the best way to start an asymmetrical gallery wall layout?
Begin with a large anchor photo to establish the foundation of your asymmetrical layout. Position this statement piece first, then arrange smaller images around it to create natural flow. Step back frequently during installation to ensure visual balance and cohesive storytelling throughout the display.
How can I create a timeline wall showcasing family milestones?
Arrange photos chronologically from left to right, starting with birth announcements and progressing to current family photos. Include milestone moments like childhood achievements, graduations, and weddings. Use uniform matting and framing for consistency, and maintain equal spacing between different life stages for optimal visual flow.
What are the benefits of using picture ledges for family photos?
Picture ledges offer flexibility for easily updating and rearranging your display without creating new nail holes. You can layer multiple photos on each shelf, with larger frames positioned behind smaller ones for depth. This solution is perfect for renters and those who frequently update their family photo collections.
How should I incorporate lighting into my family picture wall?
Use picture lights above gallery walls for focused illumination, track lighting for larger displays, or battery-operated LED strips for ambient lighting. Proper lighting highlights individual photos and creates a warm, inviting atmosphere that makes your family memories stand out as a stunning focal point.
What’s the advantage of creating a black and white themed gallery wall?
A monochrome theme creates timeless elegance and visual cohesion across your entire display. Converting color photos to black and white unifies different lighting conditions and time periods. Use matching black or white frames and mix different photo finishes like matte and glossy for added texture.
How can I maximize corner spaces for family photo displays?
Transform overlooked corners into meaningful focal points using triangular or fan-shaped arrangement patterns. Extend your gallery wall into adjacent spaces like staircases and hallways for seamless visual flow. Corner displays work especially well in reading nooks where family photos enhance the cozy atmosphere.