There’s something magical about fairy lights that instantly transforms any living space from ordinary to extraordinary. These delicate strands of twinkling illumination have become our go-to solution for creating cozy ambiance and adding personality to living rooms across the country.
We’ve discovered that fairy lights aren’t just for holidays or outdoor spaces anymore – they’re versatile design elements that can dramatically enhance your living room’s atmosphere year-round. Whether you’re looking to create a romantic setting for date nights or establish a warm gathering space for family movie marathons, the right fairy light arrangement can make all the difference.
From elegant wall cascades to creative furniture accents, we’ll explore innovative ways to incorporate these enchanting lights into your living room design. You’ll learn how to maximize their impact while maintaining that perfect balance between whimsical charm and sophisticated style that makes guests feel instantly welcome in your home.
Create a Cozy Reading Nook With Fairy Light Curtains
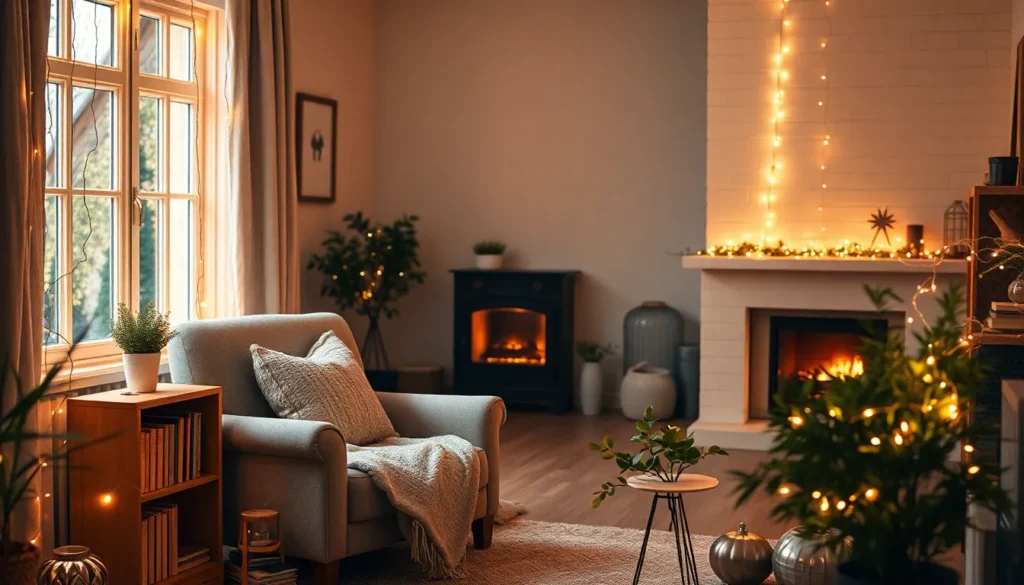
Reading corners become magical retreats when we drape fairy light curtains behind our favorite armchair. This enchanting backdrop transforms ordinary spaces into intimate sanctuaries perfect for losing ourselves in captivating stories.
Choose the Right Corner Space
Select a corner that receives minimal foot traffic to ensure our reading sessions remain undisturbed. We need approximately 6-8 feet of wall space to create an effective backdrop that won’t feel cramped when we settle in with our books.
Position the reading chair at least 2-3 feet away from the wall to prevent the fairy lights from creating harsh shadows across our pages. Natural light sources like windows work wonderfully during daytime reading, while our fairy light curtains provide the perfect ambiance for evening literary adventures.
Consider corners near built-in shelving or bookcases to create a cohesive reading environment. These spots often feature existing electrical outlets, making our fairy light installation much simpler without requiring extension cords that could create safety hazards.
Install Curtain Rods or Hooks
Mount curtain rods 12-18 inches above where we want our fairy light curtains to begin for optimal draping effect. We recommend using sturdy brackets that can support both the weight of the lights and any gentle tugging that might occur during installation or adjustment.
Space wall hooks approximately 18-24 inches apart if we prefer a more flexible hanging system over traditional rods. Command strips work excellently for lightweight fairy light strings, while screw-in hooks provide better support for heavier LED curtain lights.
Install multiple mounting points at varying heights to create cascading layers of light that add depth to our reading nook. This technique allows us to adjust the fairy light positioning seasonally or whenever we rearrange our living room furniture.
Layer Different Light Densities
Combine warm white fairy lights with cooler daylight LEDs to create ever-changing lighting that adapts to our reading preferences throughout the day. Dense clusters of 300+ lights per strand work beautifully for the main curtain backdrop, while sparser 100-light strings add subtle accent lighting.
Alternate between steady and twinkling light modes to establish the perfect reading atmosphere. Steady lights provide consistent illumination for focused reading, while gentle twinkling creates a dreamy ambiance during relaxation periods between chapters.
Mix different fairy light sizes and styles within our curtain arrangement for visual interest. Micro LEDs create delicate starlight effects, while larger bulb fairy lights add warmth and character to our cozy reading sanctuary.
Frame Your Windows With Twinkling Light Borders

Creating a luminous window display transforms your living room into a magical sanctuary. We’ll show you how to achieve professional-looking results with simple techniques that enhance natural light during the day and create stunning illumination after dark.
Measure Window Dimensions Accurately
Start by measuring your window’s width and height to determine the exact amount of fairy lights you’ll need. We recommend adding an extra 12-18 inches to your measurements to account for corners and connection points. Most standard living room windows require 15-20 feet of fairy lights for complete coverage around the perimeter.
Document your measurements by writing them down or taking photos of your measuring tape against the window frame. This prevents costly mistakes when purchasing lights and ensures you won’t run short during installation. Double check your measurements by having someone else verify the numbers before heading to the store.
Select Adhesive Hooks for Easy Installation
Choose clear plastic adhesive hooks that can support up to 2 pounds each for lightweight LED fairy lights. We prefer Command hooks because they remove cleanly without damaging paint or leaving residue on window frames. Space these hooks every 8-12 inches around your window perimeter for optimal light distribution and secure attachment.
Test the adhesive strength by pressing each hook firmly against the surface for 30 seconds before hanging lights. Clean the installation area with rubbing alcohol beforehand to ensure maximum adhesion. Avoid placing hooks directly on glass surfaces as temperature changes can cause them to lose their grip.
Coordinate With Existing Window Treatments
Match your fairy light color temperature to complement your curtains, blinds, or valances for a cohesive design aesthetic. We suggest warm white lights (2700K-3000K) for rooms with cream, beige, or earth-tone window treatments, while cool white lights (4000K-5000K) work better with gray, blue, or modern minimalist decor.
Position the lights so they don’t interfere with your window treatments’ functionality, keeping them at least 2 inches away from moving parts like curtain rods or blind mechanisms. Consider installing the lights on the inside edge of the window frame if you have heavy drapes that might obstruct the illumination. This placement creates a beautiful backlit effect when curtains are drawn while maintaining the magical border when they’re open.
Design a Stunning Fairy Light Wall Gallery

We’ll transform your living room walls into a captivating display that combines cherished memories with enchanting illumination. This creative approach elevates traditional photo galleries by incorporating fairy lights as both functional lighting and decorative elements.
Plan Your Photo Layout First
Decide on the arrangement of your photos before starting the project. We recommend sketching your design on paper or using painter’s tape to mark photo positions on the wall. Consider themes like family milestones, travel adventures, or seasonal memories to create cohesive visual storytelling.
Select photos that complement your living room’s color palette. We suggest choosing images with similar tones or creating intentional contrast for dramatic effect. Mix different photo sizes like 4×6 prints with larger 8×10 formats to add visual interest and depth to your gallery wall.
Determine the overall aesthetic you want to achieve. We find that planning helps avoid costly mistakes and ensures your fairy light wall gallery enhances rather than overwhelms your existing living room decor.
Use Clips to Attach Pictures
Use mini clips or clothespins to hang your photos from the fairy lights. We prefer wooden clothespins for rustic charm or metallic clips for modern sophistication. This method allows easy photo rotation without damaging your pictures or requiring permanent installations.
Position clips strategically along the light strand. We space them approximately 12 to 18 inches apart to create balanced visual weight across your gallery. Choose clips that complement your fairy light color temperature and living room style.
Secure heavier photos with double clips. We recommend this technique for larger prints or framed photos to prevent drooping or falling. The whimsical touch these clips add makes your gallery feel personal and lived in.
Create Geometric Patterns With Lights
Arrange the fairy lights in geometric patterns around your photos. We create triangles, diamonds, or hexagonal shapes using the light strands as guides for photo placement. These patterns add sophisticated structure to your gallery while maintaining the magical fairy light ambiance.
Use straight lines and angular shapes for modern appeal. We position lights in parallel lines or grid formations to frame rectangular photo arrangements. This geometric approach works particularly well in contemporary living rooms with clean architectural lines.
Combine multiple geometric shapes for added visual interest. We layer different patterns at varying heights to create dimensional wall art that catches light beautifully throughout the day and evening hours.
Transform Your Mantelpiece Into a Magical Focal Point

Your mantelpiece offers the perfect elevated platform to showcase fairy lights as a stunning centerpiece. We’ll show you how to create an enchanting display that draws the eye and warms the entire room.
Drape Lights Naturally Along the Ledge
Draping fairy lights along your mantelpiece ledge creates an instant warm glow that enhances displayed items like vases and photos. We recommend starting from one end and allowing the lights to cascade naturally, following the contours of your decorative pieces. Let the cord flow organically between objects rather than forcing rigid patterns.
Positioning lights behind taller items like candlesticks or picture frames adds depth and creates beautiful silhouettes. We suggest leaving small loops of lights hanging over the edge to add visual interest and movement. Battery-powered LED strings work best for mantelpieces since they eliminate the need for visible cords running to outlets.
Incorporate Seasonal Decorative Elements
Incorporating seasonal elements like pinecones, holly, or flowers with your fairy lights creates a festive atmosphere that evolves throughout the year. We blend these natural materials directly with the light strings, weaving them between branches of greenery or tucking them around individual bulbs. Spring calls for fresh flowers and pastel ribbons, while autumn invites warm-toned leaves and miniature pumpkins.
Winter decorations like frosted pinecones and evergreen sprigs complement the sparkle of fairy lights beautifully. We layer these elements at varying heights to create visual depth and texture. Summer arrangements might feature seashells, driftwood, or dried flowers that maintain the magical ambiance while reflecting the season’s energy.
Balance Light Distribution Evenly
Balancing light distribution evenly across your mantelpiece ensures a harmonious and cozy atmosphere throughout the entire space. We measure our mantelpiece length and divide it into equal sections, placing clusters of lights at regular intervals to avoid dark spots. Concentrated areas of brightness should alternate with gentler illumination to create rhythm and flow.
Testing your arrangement from different viewing angles helps identify any gaps or overly bright sections that need adjustment. We recommend stepping back frequently during setup to assess the overall balance from your main seating area. Dimmer controls or lights with multiple brightness settings allow you to fine-tune the intensity for different occasions and times of day.
Add Ambient Lighting Behind Your Television

We’ll transform your entertainment area into a cinematic experience with fairy lights strategically placed behind your TV. This technique reduces eye strain during movie nights while creating a sophisticated backdrop that enhances your viewing experience.
Install LED Strip Backing
Installing LED strip lights behind your television creates a stunning halo effect that dramatically improves your viewing comfort. We recommend measuring your TV’s perimeter first and purchasing strips that exceed these dimensions by 12-18 inches for optimal coverage.
Cleaning the back surface of your television ensures the adhesive strips bond properly and remain secure over time. Position the strips approximately 2-3 inches from the TV’s edges to create an even glow that extends beyond the screen borders. Most LED strips come with 3M adhesive backing that works well on smooth surfaces like TV bezels and wall mounts.
Starting from the bottom center of your TV works best for achieving symmetrical light distribution around the entire perimeter. Connect multiple strips using corner connectors to maintain consistent brightness throughout the installation. Test the lights before final placement to ensure all connections work properly and produce uniform illumination.
Choose Warm White Tones
Selecting warm white fairy lights with a color temperature between 2700K and 3000K creates the most comfortable ambient lighting for television viewing. We’ve found that cool white lights can create harsh contrasts that strain your eyes during extended viewing sessions.
Warm tones complement most living room color schemes and provide gentle illumination that doesn’t compete with your screen’s display. Dimmable warm white strips offer the flexibility to adjust brightness levels based on different viewing scenarios like action movies or romantic comedies.
Avoiding RGB or color-changing lights for this application prevents distracting color shifts that can interfere with your focus on the screen content. Pure warm white maintains a consistent atmosphere that enhances rather than overwhelms your entertainment experience.
Ensure Proper Cable Management
Managing cables properly keeps your fairy light installation looking clean and professional while preventing potential safety hazards. We suggest using cable clips or adhesive cable channels to route power cords along your TV stand or wall mount system.
Securing excess cable length prevents tangling and reduces the risk of accidentally unplugging your lights during furniture rearrangement. Position power adapters in accessible locations where they won’t interfere with other electronic components or create unsightly cord bundles.
Planning your cable routing before installation saves time and ensures a polished final appearance that complements your living room’s aesthetic. Keep power cords away from heat sources like gaming consoles or cable boxes to prevent potential damage to the fairy light system.
Create a Bohemian Ceiling Canopy Effect

Transform your living room into an enchanting bohemian sanctuary by draping fairy lights across the ceiling to mimic a celestial sky. This whimsical approach works exceptionally well with plush textiles and rustic wood accents that define bohemian decor.
Map Out Your Ceiling Anchor Points
Planning your fairy light placement ensures even distribution and maximizes visual impact throughout your living space. We recommend measuring your ceiling dimensions and marking potential anchor points before purchasing any lighting supplies. Corner brackets provide the strongest support for heavier light strings, while central ceiling points create stunning focal areas. Strategic spacing of 3 to 4 feet between anchor points prevents sagging and maintains the magical canopy effect you’re aiming for.
Use Transparent Fishing Line for Support
Transparent fishing line offers invisible support that maintains a clean, minimalist aesthetic while securing your fairy lights. We suggest using 20-pound test fishing line for most standard fairy light installations to ensure adequate strength without visible bulk. Threading the line through small ceiling hooks allows for easy adjustment and repositioning of your lights as needed. This technique eliminates the need for obvious mounting hardware that could detract from your bohemian ambiance.
Vary the Hanging Heights
Creating different hanging heights adds depth and visual dimension to your celestial ceiling canopy. We recommend alternating heights between 6 inches and 2 feet from the ceiling to achieve the most ever-changing layered effect. Lower hanging sections work beautifully over seating areas where they create intimate lighting zones for conversation. Higher sections maintain open pathways while contributing to the overall starry sky atmosphere that defines this bohemian lighting approach.
Illuminate Your Bookshelf With Cascading Lights

Transform your bookshelf into a captivating focal point that combines literature with luminous charm. Cascading fairy lights create depth and visual interest while drawing attention to your favorite reads and treasured collectibles.
Weave Lights Between Book Sections
Weave fairy lights strategically between different book sections to create organized zones of warm illumination. Start at the top shelf and work your way down, allowing the lights to naturally cascade from one level to the next. Position lights behind alternating rows of books to create a layered lighting effect that adds dimension to your display.
Thread the lights carefully around book spines to avoid tangling while maintaining easy access to your collection. Leave small loops of light visible between sections to create gentle focal points that guide the eye across your bookshelf. Secure excess cord length behind books using small adhesive clips to maintain a clean appearance.
Create dramatic contrast by alternating illuminated and darker sections along each shelf level. This technique draws attention to exact book collections while maintaining visual balance throughout the entire bookshelf display.
Highlight Decorative Objects
Highlight decorative objects like vases, sculptures, and figurines by positioning fairy lights strategically around their base or behind them. Place lights at varying distances from objects to create different shadow effects and depth perception. Coil lights around cylindrical vases or wrap them loosely around sculptural pieces to enhance their three-dimensional qualities.
Direct light upward toward decorative items placed on higher shelves to create dramatic uplighting effects. Position battery-powered fairy light strings behind translucent objects like glass bowls or ceramic pieces to create stunning backlighting that makes them appear to glow from within.
Group smaller decorative objects together and surround them with a gentle ring of fairy lights to create miniature vignettes throughout your bookshelf. Adjust light spacing to ensure each decorative piece receives adequate illumination without overwhelming the overall display.
Avoid Overheating Near Paper Materials
Avoid overheating issues by maintaining proper distance between fairy lights and paper materials like books, magazines, and important documents. Keep LED fairy lights at least 2 inches away from book spines and paper surfaces to prevent heat damage. Choose low-voltage LED options that generate minimal heat compared to traditional incandescent bulbs.
Monitor light temperature regularly by touching the cord and bulbs after several hours of continuous use. Replace any lights that feel excessively warm or show signs of wear to maintain safe operation around your valuable book collection.
Install timer controls to limit continuous operation and prevent prolonged heat exposure to paper materials. Set automatic shutoff schedules that align with your daily routine while preserving the lifespan of both your fairy lights and your cherished books.
Design a Romantic Fireplace Surround

Transform your fireplace into the heart of romance with strategically placed fairy lights that create warmth and intimacy. We’ll show you how to enhance your fireplace area with enchanting illumination that works year round.
Wrap Lights Around Decorative Logs
Wrapping fairy lights around decorative logs creates an instant cozy glow that makes your fireplace area feel inviting even when not in use. We recommend selecting logs with interesting textures like birch bark or driftwood that complement the twinkling lights beautifully. Position three to five logs of varying sizes on your hearth or inside the firebox for visual balance.
Weave warm white LED fairy lights around each log starting from the base and spiraling upward to the top. Leave small gaps between the light wraps to prevent overheating and allow the natural wood grain to show through. Battery operated lights work best for this application since you won’t need to worry about hiding electrical cords or finding nearby outlets.
Frame the Fireplace Opening
Framing your fireplace opening with fairy lights creates a stunning border that draws attention to this architectural focal point. We suggest measuring the perimeter of your fireplace opening and adding an extra two feet of lights for proper coverage and connection points. Use small adhesive hooks or tiny nails placed every 12 inches along the fireplace surround to support the light strand.
Start at one bottom corner and work your way up and around the opening maintaining consistent spacing between the lights and the edge. Choose lights with copper or silver wire that blends seamlessly with your fireplace materials like stone brick or metal. Warm white lights typically complement most fireplace surrounds while colored lights can match seasonal decorating themes.
Consider Battery-Operated Options
Battery operated fairy lights offer the ultimate flexibility for fireplace decoration without the hassle of cords or the need for nearby electrical outlets. We find that modern LED battery packs can power fairy light strands for 6 to 8 hours continuously making them perfect for evening entertainment. Look for packs with timer functions that automatically turn lights on and off at predetermined times.
Position the battery pack behind decorative elements like vases or picture frames to keep it hidden from view. Choose rechargeable battery options to reduce long term costs and environmental impact. Many battery operated fairy lights now include remote controls that let you adjust brightness levels and switch between different lighting modes from across the room.
Build a Fairy Light Coffee Table Centerpiece

Creating a stunning coffee table centerpiece with fairy lights brings warmth and elegance to your living room’s heart. This approach transforms ordinary table decor into an enchanting focal point that complements your existing lighting scheme.
Use Glass Containers for Safety
Glass containers provide the perfect housing for fairy lights while ensuring safe operation throughout your living room. Clear glass vases or decorative bowls create beautiful displays on coffee tables without compromising electrical safety. We recommend selecting containers with wide openings to accommodate battery packs and allow easy access for maintenance.
Transparent vessels amplify the fairy lights’ glow while protecting them from dust and accidental damage. Large mason jars work exceptionally well for battery-operated fairy lights because they offer ample space for light strings and power sources. Consider using hurricane lanterns or cylinder vases to create varying heights across your coffee table surface.
Fill your chosen containers with decorative elements like pebbles or marbles to anchor the lights and add textural interest. These materials help position the lights optimally while creating stunning light refraction patterns throughout your living room space.
Create Layered Light Effects
Layered lighting techniques transform your coffee table centerpiece into a sophisticated illumination system. Combine fairy lights with candles of different heights to establish multiple light sources that work harmoniously together. We suggest positioning battery-operated fairy lights as your base layer while adding pillar candles or tea lights for accent illumination.
Table lamps nearby can serve as your primary lighting source while fairy lights provide ambient enhancement. This combination ensures your coffee table remains functional for reading or conversation while maintaining that magical atmosphere we’ve been building throughout your living room.
Varying the intensity of different light sources allows you to adjust the mood throughout the day. We recommend using fairy lights with dimmer functions or multiple brightness settings to coordinate with your other lighting elements seamlessly.
Match Your Room’s Color Scheme
Color coordination ensures your fairy light centerpiece integrates naturally with your existing living room decor. Warm white fairy lights complement neutral palettes and wood tones while cool white options work better with modern or minimalist color schemes. We suggest testing different color temperatures in your exact lighting environment before making final selections.
Consider your room’s dominant colors when choosing decorative elements for your glass containers. Green eucalyptus or ferns work beautifully with earth-tone palettes while silver or gold accents complement more formal color schemes. Match the metal finish of your fairy light wires to other metallic elements in your living room like picture frames or lamp bases.
Seasonal color adjustments keep your centerpiece fresh and relevant throughout the year. We recommend investing in interchangeable decorative elements that coordinate with your holiday themes while maintaining your core fairy light foundation.
Craft a Whimsical Plant Corner Display

Transforming an unused corner into a magical plant sanctuary creates an enchanting focal point that complements our existing fairy light installations. This approach combines the natural beauty of greenery with twinkling illumination to establish a cozy atmosphere that extends our living room’s warm ambiance.
Wrap Lights Around Large Plant Pots
Battery-operated fairy lights offer the perfect solution for illuminating plant displays without complicated electrical installations. We recommend wrapping these flexible lights around the rims of large plant pots to create stunning uplighting that accentuates foliage from below. The soft glow emanating from the base draws attention to the natural textures and colors of our plants while adding another layer of ambient lighting to our living space.
Flexible wire construction makes installation effortless as we can easily mold the lights to follow the curves of different pot shapes and sizes. Securing the lights becomes simple when we tuck the battery pack discretely behind larger pots or beneath decorative plant stands. This positioning keeps the magical effect while maintaining a clean aesthetic that flows naturally with our other lighting elements.
Highlight Hanging Planters
Hanging planters create vertical interest in our living room design and become even more captivating when paired with strategically placed fairy lights. We can weave lights around the hooks or suspension chains to draw the eye upward and emphasize the three-dimensional aspect of our plant display. Threading lights through the planters themselves creates depth and makes suspended greenery a true centerpiece that complements our ceiling-draped fairy light installation.
The interplay between hanging plants and fairy lights adds sophisticated layering to our lighting scheme while maintaining the whimsical charm we’ve established throughout the room. Varying the heights of our hanging planters allows us to create multiple focal points that work harmoniously with our existing fairy light arrangements.
Choose Solar-Powered Options for Sustainability
Solar-powered fairy lights represent an eco-friendly alternative that reduces electricity consumption while maintaining the magical ambiance we desire for our plant displays. These sustainable options work exceptionally well in corners near windows where ample sunlight can charge the integrated solar panels throughout the day. The automatic operation eliminates the need for manual switching and ensures our plant corner remains beautifully illuminated each evening.
Installation becomes remarkably simple with solar-powered options since we don’t need to consider proximity to electrical outlets or manage extension cords. The self-contained design allows us to position our plant corner fairy lights exactly where they create the most visual impact while supporting our commitment to environmentally conscious living room design choices.
Conclusion
We’ve explored countless ways to transform your living room into a magical sanctuary using fairy lights. From cozy reading nooks to stunning ceiling displays these versatile lighting answers offer endless possibilities for creating the perfect ambiance.
The beauty of fairy lights lies in their ability to adapt to any style or season. Whether you’re aiming for bohemian charm or sophisticated elegance these simple additions can completely change how your space feels and functions.
Remember that the key to success is planning your layout carefully and choosing the right type of lights for each application. Battery-operated options offer flexibility while LED varieties ensure safety and longevity.
Start with one or two ideas that resonate with your vision then gradually expand your fairy light installations. Your living room will soon become the warm welcoming space you’ve always dreamed of.
Frequently Asked Questions
How can fairy lights transform my living room ambiance?
Fairy lights create a warm, cozy atmosphere that instantly enhances any living space. They offer versatile lighting solutions for various occasions, from romantic date nights to family movie time. By strategically placing them throughout your room, you can achieve a perfect balance between whimsical charm and sophisticated style that makes guests feel welcome.
What’s the best way to create a cozy reading nook with fairy lights?
Choose a quiet corner with sufficient wall space and drape fairy light curtains behind your armchair. Install curtain rods or hooks for optimal placement, ensuring the chair position avoids harsh shadows. Layer different light densities and mix various styles to create a dynamic, intimate retreat that adapts to your reading preferences throughout the day.
How do I properly frame windows with fairy lights?
Start by accurately measuring your window dimensions and add extra length for corners and connections. Use clear adhesive hooks with proper spacing for optimal light distribution. Coordinate the color temperature with existing window treatments to maintain a cohesive design aesthetic while ensuring the lights don’t interfere with curtain or blind functionality.
Can I create a photo gallery using fairy lights?
Yes! Plan your photo layout first, considering themes and color palettes for cohesive visual storytelling. Use clips to attach pictures to fairy lights for easy rotation, securing heavier photos with double clips to prevent drooping. Create geometric patterns around photos to add structure and sophistication while maintaining the magical fairy light ambiance.
How can I decorate my mantelpiece with fairy lights?
Drape lights along the mantelpiece ledge to create a warm glow that enhances decorative items. Position lights behind taller objects for added depth and incorporate seasonal elements like pinecones or flowers. Balance light distribution evenly across the mantelpiece and consider using dimmer controls to adjust the ambiance for different occasions.
Is it safe to put fairy lights behind my TV?
Yes, when done properly. Use LED strip lights specifically designed for TV backlighting to create a stunning halo effect while reducing eye strain during movie nights. Choose warm white tones for comfortable ambient lighting, ensure proper cable management, and measure carefully before installation to achieve optimal coverage and maintain a professional look.
How do I create a ceiling fairy light display?
Plan anchor points carefully for even light distribution across your ceiling. Use transparent fishing line for a minimalist aesthetic that mimics a celestial sky. Vary the hanging heights to add depth and visual dimension, creating intimate lighting zones while maintaining an open atmosphere throughout your living room.
Can I safely illuminate my bookshelves with fairy lights?
Yes, but use caution. Weave lights between book sections for organized illumination zones and position lights around decorative objects’ bases for highlighting. Maintain safe distance between lights and paper materials to prevent overheating, use low-voltage LED options, and install timer controls to limit continuous operation for safety and longevity.
What’s the best way to create a romantic fireplace display?
Wrap battery-operated fairy lights around decorative logs for a cozy glow and frame the fireplace opening with lights for visual impact. Use modern LED battery packs with timer functions and remote controls for convenience. Battery-operated options provide flexibility and eliminate safety concerns around heat sources.
How do I make a fairy light coffee table centerpiece?
Use glass containers with wide openings for easy battery pack access. Create layered light effects by combining fairy lights with candles, and match your centerpiece to the room’s color scheme for cohesion. Make seasonal adjustments to decorative elements to keep the centerpiece fresh and engaging throughout the year.
Can I combine fairy lights with plants in my living room?
Absolutely! Wrap battery-operated fairy lights around large plant pots for stunning uplighting effects. Use hanging planters paired with fairy lights to create vertical interest and depth. Consider solar-powered fairy lights as an eco-friendly option that allows for easy installation while maintaining sustainable living practices and enchanting ambiance.