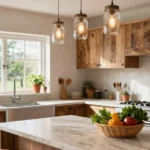
Opening up your kitchen to the living room through strategic window placement creates an instant sense of connection and spaciousness that transforms your entire home’s flow. We’ve seen countless homeowners struggle with cramped, isolated kitchens that feel disconnected from the heart of family life – but a well-designed kitchen window to living room opening changes everything.
The magic happens when you break down that visual barrier between spaces. Whether you’re considering a traditional pass-through window, sleek breakfast bar opening, or modern sliding glass partition, these design answers instantly make both rooms feel larger and more inviting. Your kitchen becomes part of the conversation instead of a separate workspace.
We’ll explore innovative window styles, practical considerations for different home layouts, and budget-friendly options that deliver maximum impact. From maintaining sightlines while cooking to creating seamless entertaining spaces, these kitchen window ideas will revolutionize how your family experiences daily life together.
Open the Space With a Pass-Through Window
Pass-through windows create an immediate connection between your kitchen and living room while maintaining distinct zones for cooking and relaxation.
Remove the Wall Completely for Maximum Flow
Removing the entire wall between your kitchen and living room creates the most dramatic transformation we can achieve with this renovation approach. We recommend consulting a structural engineer before demolishing any walls to ensure you’re not removing load-bearing supports that keep your home stable.
Complete wall removal works best in homes with open floor plans where the kitchen and living room share similar ceiling heights. We’ve seen this approach increase perceived space by up to 40% in smaller homes under 1,200 square feet.
Consider installing a kitchen island or peninsula where the wall once stood to maintain some separation between cooking and living areas. This replacement feature provides additional storage and prep space while preserving the open flow you’ve created.
Install a Counter-Height Window Ledge for Serving
Counter-height window ledges transform your pass-through opening into a functional serving station that bridges your kitchen and living room activities. We typically install these ledges at 36 inches high to match standard kitchen counter heights for seamless workflow.
Choose materials that complement both spaces, such as butcher block for warmth or quartz for durability and easy cleaning. We recommend extending the ledge 12 to 18 inches into the living room to create comfortable seating space for bar stools.
Install electrical outlets along the ledge to support small appliances like coffee makers or blenders that you might use for entertaining. Adding pendant lights above the ledge creates ambiance while defining the boundary between your kitchen and living spaces.
Add Sliding Glass Panels for Flexible Privacy
Sliding glass panels offer the perfect compromise when you want connection with the option to close off your kitchen during messy cooking sessions or formal entertaining. We install track systems that allow panels to slide completely out of sight when you want full openness.
Frosted or textured glass provides privacy while maintaining light flow between spaces, making both rooms feel brighter throughout the day. Clear glass maximizes visual connection but requires more frequent cleaning to maintain the seamless look.
Consider installing panels that slide into pocket walls for a completely unobstructed opening when desired. We’ve found that three-panel systems work best for openings between 6 and 8 feet wide, allowing you to partially or fully close the space as needed.
Create a Breakfast Bar Connection

We can transform our kitchen window into a ever-changing breakfast bar that serves as both a functional workspace and social hub. This approach creates an inviting connection point where family members can gather while maintaining the distinct character of each room.
Build a Peninsula Counter Extension
Extending our kitchen counter through the window opening creates a seamless peninsula that bridges both spaces. This counter extension serves as additional prep space on the kitchen side while providing a convenient serving area for the living room. We’ll want to match the existing countertop material to maintain visual continuity throughout the design.
Planning the peninsula dimensions requires careful consideration of traffic flow in both rooms. Standard counter height of 36 inches works well for food preparation, while we can add a raised bar section at 42 inches for comfortable seating. The extension should project 12 to 18 inches into the living room to provide adequate knee space without overwhelming the area.
Structural support becomes essential when extending counters beyond their original footprint. We’ll need to install proper brackets or support posts to handle the weight of the countertop and any items placed on it. Professional consultation ensures the extension meets building codes and safety requirements.
Install Bar Stools for Casual Dining
Positioning bar stools on the living room side creates an instant casual dining area that encourages interaction. We recommend placing stools 24 to 26 inches apart to provide comfortable seating space for each person. Counter height stools at 24 to 26 inches work perfectly with standard 36 inch counters.
Choosing the right stool style impacts both comfort and visual appeal of our breakfast bar connection. Backless stools tuck neatly under the counter when not in use, maintaining clean sight lines between rooms. Stools with backs offer more comfort for longer conversations and meals.
Swivel functionality adds practical value to our bar stool selection. Swivel stools allow family members to easily turn between the kitchen and living room activities without repositioning the entire seat. We can secure stools to the floor in high traffic areas to prevent unwanted movement.
Add Under-Counter Storage Answers
Installing under counter storage on the kitchen side keeps essential items organized while maintaining clear views through our window connection. We can add pull out drawers, lazy Susans, or vertical dividers to maximize storage efficiency in these typically underutilized spaces.
Mason jars and small containers work excellently for storing frequently used kitchen items near our breakfast bar window. These storage answers add visual interest while keeping spices, utensils, and small appliances within easy reach. Clear containers allow us to quickly identify contents without opening each one.
Built in shelving beneath the counter extension provides designated storage for dining essentials. We can install open shelves for displaying attractive dishware or closed cabinets for hiding less appealing items. Adjustable shelving accommodates items of varying heights and allows for future reorganization needs.
Wine storage and small appliance garages fit perfectly in under counter spaces near our breakfast bar. These specialized storage answers keep countertops clear while providing easy access to frequently used items. Electrical outlets installed in appliance garages allow us to keep small appliances plugged in and ready for use.
Install a Kitchen Window Wall Opening

Installing a kitchen window wall opening creates a dramatic focal point that transforms how both spaces function together. This architectural modification requires careful planning to ensure structural integrity while maximizing the visual and practical benefits.
Frame the Opening With Decorative Trim
Decorative trim around your new kitchen window opening creates a polished, intentional look that ties both rooms together seamlessly. We recommend using molding styles that complement your existing architectural details in both the kitchen and living room.
Crown molding at the top of the opening adds elegance and draws the eye upward, making ceilings appear higher. Side trim pieces can incorporate fluted details or raised panels that echo cabinet styles in your kitchen.
Consider these popular trim options for framing your opening:
- Traditional casing with corner blocks for classic homes
- Shaker-style trim for clean, modern aesthetics
- Craftsman molding with thick profiles for bungalow styles
- Beaded trim for cottage or farmhouse designs
Color coordination between the trim and existing woodwork ensures a cohesive appearance throughout both spaces.
Use Matching Materials to Both Spaces
Matching materials across your kitchen window opening creates visual continuity that makes both rooms feel like one cohesive space. Granite sills that match your kitchen countertops establish an immediate connection between the two areas.
We suggest extending the same flooring material from one room into the other where possible. Hardwood floors that flow seamlessly through the opening eliminate visual breaks and create a sense of expanded space.
Wall colors should complement each other rather than match exactly. Paint the trim around your opening in a color that appears in both rooms to create harmony.
Consider these material coordination strategies:
| Material Element | Kitchen Side | Living Room Side | Connection Method |
|---|---|---|---|
| Countertop/Sill | Granite/Quartz | Matching stone sill | Same material source |
| Flooring | Tile/Hardwood | Extend same material | Continuous installation |
| Paint Colors | Kitchen palette | Complementary shade | Shared accent color |
| Hardware | Cabinet pulls | Light fixtures | Same finish family |
Consider Load-Bearing Wall Requirements
Load-bearing wall modifications require professional consultation to maintain your home’s structural integrity throughout the installation process. We strongly recommend having a structural engineer evaluate the wall before beginning any removal work.
Professional assessment determines whether additional support beams are necessary to carry the load previously handled by the removed wall section. Steel or engineered lumber headers often replace the structural function of the removed wall portion.
Permit requirements vary by location, but most municipalities require permits for load-bearing wall modifications. Your contractor should handle the permit application process and ensure all work meets local building codes.
Warning signs that indicate a load-bearing wall include:
- Walls running perpendicular to floor joists above
- Walls positioned directly under beams or columns
- Walls located near the center of the home’s span
- Walls supporting visible beams or structural elements
Professional installation ensures your kitchen window opening enhances your space safely while maintaining the structural soundness of your home.
Design a Bi-Fold Window System

Bi-fold windows create an exceptional connection between your kitchen and living room by opening wide spaces when folded back. This window system works particularly well in modern open-plan designs where you want seamless integration between cooking and relaxation areas.
Choose Hardware That Complements Your Style
Material selection plays a crucial role in creating visual harmony between your kitchen and living room spaces. We recommend aluminum frames for contemporary homes seeking sleek, low-maintenance options, while wood frames suit traditional or farmhouse-style interiors perfectly. Consider how your chosen material will coordinate with existing cabinetry, furniture, and architectural elements in both rooms.
Finish options deserve careful consideration to ensure your bi-fold window hardware enhances both spaces effectively. Stainless steel finishes complement modern kitchen appliances and contemporary living room fixtures beautifully. Brass or bronze finishes work exceptionally well with warm wood tones and traditional design elements. Oil-rubbed bronze provides an excellent choice for rustic or industrial-style homes where you want to maintain consistent metal tones throughout connected spaces.
Plan for Weather Sealing and Insulation
Energy efficiency becomes critical when installing bi-fold windows between interior spaces that may have different temperature requirements. We suggest investing in well-insulated window systems that prevent heat loss during winter months and reduce cooling costs in summer. Double or triple-pane glass options provide superior insulation while maintaining clear views between your kitchen and living areas.
Weatherproofing protects your home from moisture infiltration and air leaks that can compromise indoor comfort. Professional installation ensures proper sealing around window frames using high-quality weather stripping materials. Consider how seasonal temperature changes might affect the window operation and choose expansion-resistant materials that maintain their sealing properties year-round.
Incorporate Screen Options for Fresh Air
Screen panels allow natural ventilation to flow freely between your kitchen and living room while keeping insects outside. We recommend retractable screens that can be easily deployed when you want fresh air circulation during cooking or entertaining. These screens shouldn’t obstruct your view when not in use, maintaining the open feel you’ve worked to create.
Sliding screen systems offer maximum flexibility for managing airflow throughout different seasons and activities. Install screens that can be completely removed during winter months when ventilation isn’t needed. Choose fine mesh materials that provide effective insect protection while allowing maximum air circulation and maintaining clear sightlines between your connected spaces.
Add Built-In Shelving Around the Opening

Installing built-in shelving around your kitchen window opening transforms a simple pass-through into a functional design statement. These shelves create visual interest while maximizing storage potential in both connected spaces.
Display Decorative Items and Plants
We recommend using the upper shelves to showcase decorative elements that complement both your kitchen and living room aesthetics. Vases filled with fresh flowers create a natural bridge between cooking and relaxation areas. Artworks positioned on these shelves add personality while maintaining clear sightlines through the opening.
Plants thrive in these window adjacent positions due to natural light exposure. Herb gardens in attractive containers serve dual purposes by providing fresh cooking ingredients while adding greenery to your living space. Small potted plants like succulents or trailing ivy create visual layers without overwhelming the connection between rooms.
Decorative plates and ceramic pieces displayed on open shelving introduce texture and color coordination. We suggest rotating seasonal items to keep the display fresh and captivating throughout the year.
Create Storage for Kitchen and Living Essentials
Lower shelves work perfectly for storing frequently used kitchen utensils within easy reach of your cooking area. Attractive storage baskets help organize smaller items while maintaining the clean aesthetic of your connected spaces. Pull-out drawers integrated into the shelving system provide hidden storage for less attractive necessities.
Living room accessories like remote controls, magazines, and charging stations can occupy discrete sections of the built-in system. We recommend incorporating closed storage options like cabinet doors or drawers to hide clutter while keeping essentials accessible.
Small appliances that you use regularly can find homes on these shelves, creating more counter space in your kitchen. Coffee makers, blenders, or stand mixers positioned strategically maintain functionality while contributing to the open concept design.
Use Lighting to Highlight the Display Area
Under-cabinet lighting installed beneath each shelf creates dramatic illumination that showcases your displayed items. LED strip lights provide energy-efficient options that won’t generate excess heat near your decorative elements. We suggest installing dimmer switches to control the ambiance throughout different times of day.
Accent lighting positioned above the shelving draws attention to the architectural feature while creating warm atmosphere in both spaces. Small puck lights hidden behind decorative elements create subtle backlighting effects that enhance the visual depth of your displays.
Natural light optimization requires strategic placement of reflective elements like mirrors or metallic accessories. These items bounce light throughout both rooms, making the connected spaces feel larger and more inviting during daylight hours.
Incorporate a Kitchen Island Window View

Strategic island placement can transform your kitchen window into a stunning focal point that connects both spaces seamlessly. We’ll show you how to position your island for maximum visual impact while maintaining functionality.
Position the Island to Frame the Living Room
Positioning your kitchen island to frame the living room view creates an instant conversation starter and natural gathering spot. We recommend placing the island approximately 3-4 feet from the window opening to allow comfortable movement while maintaining clear sightlines.
Strategic placement means orienting the island’s longest side parallel to the window, which naturally draws the eye toward the living room connection. Counter height seating on the living room side encourages interaction between spaces while you’re cooking or entertaining.
Consider adding decorative elements like fresh herbs, seasonal flowers, or stylish canisters on the island surface to enhance the framed view. These accessories create visual interest without blocking the important connection between your kitchen and living room.
Add Pendant Lighting for Ambiance
Pendant lighting above your kitchen island creates warm ambiance that flows naturally into the living room through the window connection. We suggest installing 2-3 pendant lights spaced 24-30 inches apart for islands longer than 6 feet, ensuring even illumination without overwhelming the space.
Choose pendant styles that complement both your kitchen cabinetry and living room decor to maintain visual continuity. Modern glass pendants work beautifully in contemporary homes, while rustic metal fixtures enhance farmhouse or industrial aesthetics.
Dimmer switches give you complete control over the lighting mood, allowing you to adjust brightness for cooking tasks or intimate dinner conversations. The reflected light from pendant fixtures naturally illuminates the living room through the window opening, creating a cohesive lighting scheme throughout both spaces.
Create Sight Lines Through Strategic Placement
Creating clear sight lines requires thoughtful furniture arrangement that maximizes the visual connection between your kitchen island and living room. We recommend aligning key living room pieces like your sofa or entertainment center with the window opening to establish a natural flow between spaces.
Keep the island surface relatively clear of tall appliances or bulky items that might obstruct the view. Small appliances like coffee makers or blenders should be stored in lower cabinets or positioned at the island’s ends rather than in the center viewing area.
Strategic placement also means considering traffic patterns around your island to ensure smooth movement between spaces. A 42-inch clearance on all sides allows comfortable passage while maintaining those important sight lines that make both rooms feel larger and more connected.
Use Glass Block Windows for Privacy

Glass block windows offer an elegant solution when you want to maintain connection between your kitchen and living room while preserving privacy and adding architectural interest.
Maintain Light Flow While Adding Texture
Glass blocks allow natural light to flow seamlessly from your kitchen to living room while creating visual separation between the spaces. We recommend installing these translucent blocks in a standard window opening to maintain the bright, open feeling that makes connected spaces so appealing. The textured surface of glass blocks diffuses light beautifully, eliminating harsh shadows and creating a soft, welcoming glow throughout both areas.
These blocks provide the perfect balance of openness and privacy, making them ideal for homes where you want to cook without feeling completely exposed to guests in the living room. The light transmission through glass blocks can increase perceived brightness by up to 30% compared to solid walls, while still maintaining distinct zones for different activities.
Choose Patterns That Match Your Decor Style
Glass blocks come in various patterns and textures that can complement your existing kitchen and living room design. We suggest selecting wave patterns for contemporary spaces, as they create flowing lines that echo modern design principles. Diamond or grid patterns work exceptionally well in traditional homes, adding classic geometric interest that ties into established architectural details.
Smooth glass blocks offer a minimalist approach that works beautifully in both modern and transitional spaces. The key is choosing a pattern that doesn’t compete with your existing finishes but rather enhances the overall aesthetic flow between your kitchen and living room areas.
Consider Colored Glass for Visual Interest
Colored glass blocks can serve as stunning accent pieces that bridge the color schemes of your kitchen and living room. We recommend selecting subtle tints like pale blue or soft green that complement your existing palette without overwhelming the space. These colored accents can tie together design elements from both rooms, creating a cohesive look that feels intentional and polished.
Amber or bronze tinted glass blocks work particularly well in kitchens with warm wood tones or brass fixtures, while clear blocks with colored edges can add just a hint of personality without dominating the design. The colored glass creates beautiful light effects throughout the day as natural light shifts, adding ever-changing visual interest to your connected spaces.
Install Accordion-Style Folding Windows

Accordion-style folding windows create the widest possible opening between your kitchen and living room spaces. These versatile systems fold back completely to eliminate barriers when you’re entertaining or need maximum flow.
Maximize Opening Width When Fully Extended
Fully extended accordion windows can open up to 90% of the wall space, creating an almost seamless transition between your kitchen and living room. We recommend measuring the entire wall width before installation to determine the maximum folding panel configuration. Standard systems accommodate openings from 6 feet to 20 feet wide, with individual panels ranging from 24 to 36 inches.
Multiple folding points allow these windows to stack neatly against one side when opened completely. Choose systems with an even number of panels for balanced stacking on both sides if you prefer symmetrical operation. The folding mechanism creates a compact bundle that typically measures only 8 to 12 inches deep when fully retracted.
Professional installation ensures proper weight distribution across the header beam to support the extended panels safely. Heavy-duty track systems distribute the load evenly and prevent sagging over time. We suggest reinforcing the header with steel supports for openings wider than 12 feet.
Select Durable Materials for Frequent Use
Aluminum frames offer exceptional durability for accordion windows that you’ll open and close regularly throughout the day. These lightweight yet strong materials resist warping and maintain smooth operation even after thousands of cycles. Powder-coated finishes protect against scratches and provide color options that match your existing trim.
Vinyl frames present a budget-friendly alternative with excellent insulation properties and minimal maintenance requirements. High-quality vinyl systems include steel reinforcement in the frame cores for added strength. Choose vinyl with UV protection to prevent fading in sun-exposed areas.
Wood frames create a traditional aesthetic but require more maintenance to preserve their appearance and function. Opt for hardwood species like oak or mahogany that naturally resist moisture and wear. Factory-applied finishes with marine-grade polyurethane provide the best protection against kitchen humidity and temperature changes.
Stainless steel hardware components ensure smooth operation and resist corrosion from cooking moisture and cleaning products. Ball bearing hinges reduce friction and extend the system’s operational life significantly. We recommend upgrading to commercial-grade hardware for windows used multiple times daily.
Plan for Easy Maintenance and Cleaning
Design your accordion window system with removable glass panels for thorough cleaning access. Individual panels lift out of the frame tracks, allowing you to clean both sides easily at ground level. This feature proves especially valuable for upper-level installations where exterior cleaning would otherwise require ladders.
Track systems need regular cleaning to maintain smooth operation and prevent debris buildup. Choose tracks with rounded profiles rather than sharp corners where grease and dust accumulate. Integrated drainage channels remove moisture automatically and reduce cleaning frequency.
Lubrication points should be easily accessible without tools for routine maintenance. Quality systems include sealed bearing assemblies that require minimal lubrication but still need periodic attention. We suggest scheduling maintenance every six months for heavily used installations.
Weather stripping replacement becomes necessary every 3 to 5 years depending on usage and climate conditions. Select systems with replaceable compression seals that you can change without removing the entire panel. Color-matched replacement parts ensure your window maintains its original appearance after maintenance.
Create a Window Nook Seating Area

Transform your kitchen window opening into a cozy gathering spot that bridges both spaces beautifully. Building a dedicated seating area beneath the pass-through creates an intimate zone where family members can connect while meals are being prepared.
Build a Bench Beneath the Window Opening
Construct a custom bench directly under your pass-through window to maximize the connection between your kitchen and living room. Measure the window opening width and extend the bench 6-12 inches beyond each side to create comfortable seating for multiple people.
Position the bench at standard seating height of 18 inches to ensure comfortable conversation flow with those working in the kitchen. Use sturdy materials like plywood or solid wood construction to support daily use while maintaining the architectural integrity of your pass-through design.
Frame the bench structure to complement your existing window trim and decorative elements. Match the bench materials to your kitchen cabinetry or living room furniture to create visual continuity across both connected spaces.
Add Cushions and Pillows for Comfort
Select weather-resistant cushions that can withstand occasional splashes from kitchen activities while providing comfortable seating. Choose cushion thickness between 3-4 inches to create optimal comfort without obstructing the window view or pass-through functionality.
Incorporate throw pillows in colors that bridge your kitchen and living room color schemes, creating visual harmony between the connected spaces. Mix different textures like linen, cotton, and velvet to add depth and interest to your seating area.
Use removable cushion covers for easy cleaning and seasonal updates, ensuring your window nook remains fresh and inviting year-round. Store extra seasonal pillows in nearby storage compartments to quickly refresh the space for different occasions.
Include Storage Within the Seating Design
Build storage compartments directly into the bench base to house items like table linens, serving pieces, or children’s books and games. Design hinged seat tops that lift to reveal spacious storage while maintaining clean lines that complement your pass-through window design.
Install pull-out drawers beneath the seating area to store kitchen utensils, mason jars, or small containers that support your pass-through serving functionality. Use drawer slides rated for frequent use to ensure smooth operation when accessing stored items during meal preparation.
Create open shelving at the back of the seating area to display decorative objects or frequently used items that enhance both kitchen and living room aesthetics. Position shelves at heights that don’t interfere with comfortable seating while providing easy access to stored essentials.
Conclusion
We’ve explored many ways to transform your kitchen-living room connection through strategic window installations. From pass-through windows to dramatic bi-fold systems, these answers can increase your perceived space by up to 40% while creating natural gathering spots for family interaction.
The key to success lies in choosing the right approach for your home’s layout and your family’s needs. Whether you opt for a simple counter-height ledge or a comprehensive wall opening with custom seating, each option offers unique benefits for improving daily life.
Remember that professional consultation is essential for structural modifications, and proper planning ensures your investment delivers lasting value. With the right design choices, you’ll create a seamless flow between spaces that encourages connection while maintaining the functionality both rooms require.
Frequently Asked Questions
What are the main benefits of opening up a kitchen to the living room with windows?
Opening up your kitchen to the living room through strategic window placement creates better family connection, increases natural light flow, and makes both spaces feel larger. This design can increase perceived space by up to 40% while maintaining distinct zones for cooking and relaxation.
What is a pass-through window and how does it work?
A pass-through window is an opening in the wall between your kitchen and living room that allows for easy interaction while keeping the spaces separate. It creates an immediate connection for serving food, conversation, and supervision while maintaining distinct functional areas.
Can I remove an entire wall between my kitchen and living room?
Yes, but only if it’s not a load-bearing wall. Removing a non-load-bearing wall can dramatically enhance space in open floor plans. Always consult a structural engineer before removal, and consider adding a kitchen island or peninsula for storage and prep space.
What are sliding glass panels and their advantages?
Sliding glass panels are movable partitions that offer flexible privacy between kitchen and living spaces. They can slide completely out of sight or into pocket walls, allowing you to open or close the connection as needed while maintaining visual continuity.
How do I create a breakfast bar connection through a kitchen window?
Build a counter-height extension through your window opening that serves as both workspace and social hub. Add bar stools with proper spacing (24-26 inches apart) and ensure the counter depth is 12-15 inches for comfortable dining and interaction.
What should I consider when installing bi-fold window systems?
Choose hardware that complements both spaces’ style – aluminum for modern homes, wood for traditional. Focus on proper weather sealing with double or triple-pane glass for energy efficiency. Consider retractable screens for natural ventilation while keeping insects out.
Do I need professional help for kitchen-living room window modifications?
Yes, especially for load-bearing walls. Consult a structural engineer to ensure safety and obtain necessary permits. Professional installation ensures proper framing, insulation, and structural integrity while meeting local building codes.
How can I add storage to my kitchen window opening design?
Incorporate under-counter storage with pull-out drawers and built-in shelving. Consider a custom bench with hinged seat tops and storage compartments. These solutions maximize efficiency while maintaining clear sightlines through the window connection.
What materials work best for kitchen-living room window connections?
Use matching materials across both spaces for visual continuity. Coordinate countertops, flooring, and trim styles. Choose durable, easy-to-clean surfaces for high-traffic areas, and select decorative trim that complements your existing architectural details.
How much does it typically cost to create a kitchen-living room window connection?
Costs vary widely based on complexity, from $500-2000 for simple pass-through windows to $5000-15000 for major wall modifications. Budget-friendly options include counter-height ledges and basic openings, while sliding panels and structural changes require larger investments.