We’ve all been there – staring into our cluttered fridge wondering where that leftover container disappeared to or discovering expired food hiding in the back corners. A disorganized refrigerator doesn’t just waste space; it wastes money and creates daily frustration that impacts our entire kitchen routine.
Transform your chaotic fridge into an efficient food storage system that saves you time and reduces food waste. With the right organization strategies you’ll maximize every inch of space while keeping your groceries fresh longer. Whether you’re dealing with a compact apartment fridge or a spacious family-sized model these proven techniques will revolutionize how you store and access your food.
Ready to say goodbye to mystery leftovers and hello to a perfectly organized refrigerator? We’ll share practical answers that’ll make your fridge work smarter not harder.
Clear Out and Clean Your Fridge Before Organizing
Starting with a completely empty and spotless fridge sets the foundation for successful organization that’ll keep your food fresh longer.
Remove All Items and Check Expiration Dates
Empty everything from your refrigerator to create a blank slate for optimal organization. We recommend placing all items on your kitchen counter or dining table where you can easily sort through them.
Check expiration dates on every single item as you remove them from the fridge. Toss anything that’s past its prime, including condiments, dairy products, and leftovers that have been sitting for more than three days.
Sort items into three categories: keep, toss, and donate. Items nearing expiration should go in your “use first” pile for immediate meal planning.
Take inventory of what you actually have to avoid buying duplicates during your next grocery trip. We’ve found that most people discover forgotten items hiding in the back corners of their fridge.
Deep Clean All Shelves and Drawers
Remove all removable shelves and drawers from your refrigerator to access every surface properly. Most modern fridges have shelves and bins that lift out easily for thorough cleaning.
Wash each component with warm soapy water in your kitchen sink or bathtub if they’re too large. We suggest using dish soap and a non-abrasive sponge to avoid scratching glass shelves.
Scrub away sticky spills and residue that have built up over time using a mixture of baking soda and water. This natural cleaning paste works effectively on stubborn stains without harsh chemicals.
Dry everything completely before putting components back in the fridge to prevent water spots and bacterial growth. Air drying for 10-15 minutes ensures no moisture remains.
Wipe Down Interior Walls and Door Seals
Clean the interior walls thoroughly using a solution of two tablespoons of baking soda mixed with one quart of warm water. This mixture neutralizes odors while removing stains and spills.
Pay special attention to door seals and gaskets where crumbs and spills commonly accumulate. We use an old toothbrush dipped in the cleaning solution to reach into the grooves and crevices.
Sanitize high-touch areas like door handles and dispensers with a disinfecting wipe or spray. These areas harbor the most bacteria from frequent contact.
Address any lingering odors by placing an open box of baking soda in the fridge overnight before organizing. Fresh coffee grounds or activated charcoal also work as natural deodorizers.
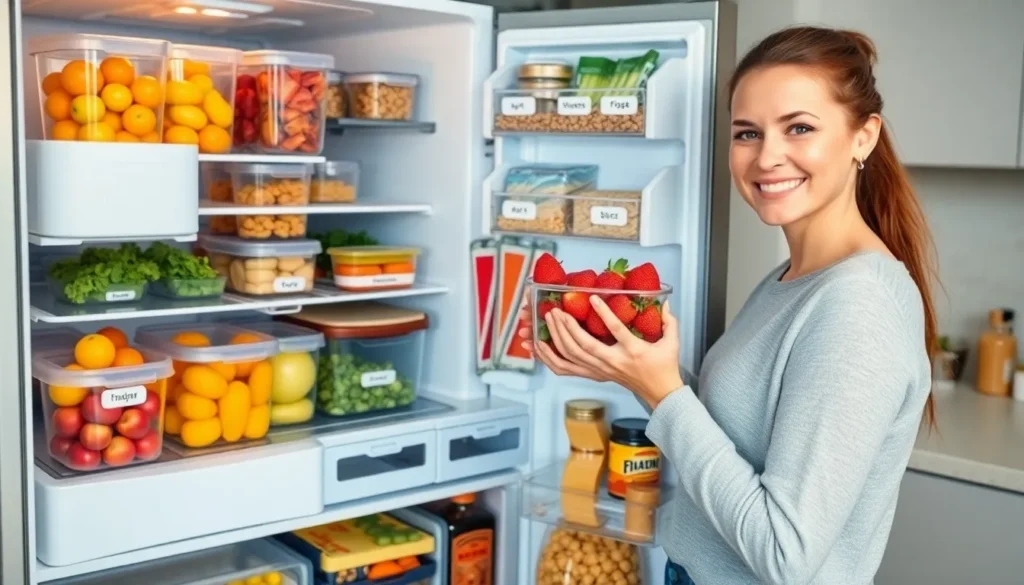
Use Clear Storage Containers for Better Visibility

Clear storage answers transform our refrigerator organization by eliminating guesswork and saving precious time during meal prep. We can quickly identify contents without opening multiple containers or rummaging through cluttered shelves.
Invest in Stackable Clear Bins
Stackable clear bins maximize our storage space while maintaining complete visibility of contents. We recommend choosing rectangular bins that fit standard fridge shelves perfectly and create vertical storage answers. These containers help us use every inch of available space by stacking items safely without crushing delicate foods.
When selecting stackable bins, we should prioritize different sizes to accommodate various food items like leftovers, produce, and snacks. Wide bins work perfectly for storing cheese blocks and deli meats, while narrow containers handle condiment bottles and small jars efficiently.
Label Each Container with Contents
Labels ensure everyone in our household knows exactly what each container holds without opening it. We can use waterproof labels that withstand refrigerator moisture and frequent handling. Clear labeling prevents confusion and helps family members quickly locate exact items during busy mornings or dinner preparation.
Date labels become especially valuable for tracking freshness and preventing food waste. We recommend including both the contents and storage date on each label to maintain optimal food safety standards.
Choose Airtight Containers for Freshness
Airtight containers prevent moisture and air from entering, which helps maintain food freshness significantly longer than standard storage methods. We’ve found that these containers reduce food spoilage by creating optimal storage environments for various ingredients. Proper sealing prevents cross contamination between different foods and eliminates unwanted odors from spreading throughout our refrigerator.
Silicone gasket lids provide the most reliable airtight seal compared to basic plastic snap tops. We should test container seals regularly by pressing gently on the lid after closing to ensure proper vacuum formation.
Organize Your Fridge by Food Categories

Creating dedicated zones for different food types transforms your refrigerator into an efficient storage system that maintains optimal freshness and reduces waste.
Designate Exact Zones for Different Food Types
Establishing clear zones helps maintain optimal storage conditions while preventing cross-contamination between different food categories. We recommend dividing your refrigerator into five main areas: dairy, meats, fruits, vegetables, and leftovers.
Temperature-sensitive items like milk and eggs perform best in the middle shelves where temperatures remain most consistent. This zone experiences the least temperature fluctuation when the door opens and closes frequently.
Produce separation becomes crucial since fruits that emit ethylene gas need different storage conditions than humidity-loving vegetables. Keep apples and pears away from leafy greens to prevent premature wilting.
Leftover management works best when you designate a exact shelf or drawer for prepared foods. Label these containers with preparation dates to track freshness and ensure timely consumption.
Keep Raw Meats on the Bottom Shelf
Bottom shelf placement prevents dangerous cross-contamination by containing any potential drips or leaks from raw meat packaging. This location naturally protects other foods from harmful bacteria.
Leak prevention becomes automatic when you store raw chicken, beef, and pork in the coldest part of your refrigerator. Use a dedicated meat drawer or place items on a rimmed tray to catch any moisture.
Temperature consistency in the bottom area maintains the cold chain essential for meat safety. This zone typically stays between 32-34°F, ideal for preventing bacterial growth.
Store Dairy Products in the Door or Main Compartment
Door storage works well for frequently accessed dairy items like butter and cheese since these products tolerate slight temperature variations better than milk or eggs. We find this placement offers convenient access during meal preparation.
Main compartment benefits include more stable temperatures for sensitive dairy products. Store milk containers toward the back of middle shelves where temperature fluctuations stay minimal.
Butter and cheese can handle door storage because their fat content provides natural preservation. But, soft cheeses and cream-based products maintain better quality in the main refrigerator compartment.
Maximize Vertical Space with Stackable Solutions

Smart vertical storage transforms cramped refrigerators into spacious food storage systems. We’ll show you three proven methods to unlock your fridge’s hidden storage potential using stackable organizers.
Add Shelf Risers to Double Storage Space
Shelf risers create instant double decker storage by adding a second level above your existing shelf space. We recommend placing these platforms throughout your fridge to accommodate condiments, small jars, and containers that typically consume valuable real estate.
Installing shelf risers allows you to stack items like yogurt cups, sauce bottles, and small leftover containers without creating precarious towers. These organizers work particularly well on middle shelves where you need quick access to frequently used items.
Metal shelf risers prove most durable for heavier items like glass jars and bottles, while plastic versions work perfectly for lighter foods. We suggest measuring your shelf height before purchasing to ensure adequate clearance for taller items underneath.
Use Stackable Drawer Organizers
Stackable drawer organizers transform your crisper drawers and shelf spaces into customizable storage compartments. These versatile containers help separate different food categories like cheeses, deli meats, and snacks while maintaining easy access to everything.
Two tier organizers excel at managing bulk items and extra condiments that don’t fit in door compartments. We find these particularly useful for storing refrigerated flour, seed bags, and specialty ingredients that need consistent cool temperatures.
Clear stackable drawers let you see contents at a peek, eliminating the guesswork when searching for exact items. These organizers also prevent smaller items from getting lost in the back corners of your fridge.
Install Under Shelf Baskets
Under shelf baskets use the forgotten space beneath your existing shelves by sliding onto shelf edges. We recommend these hanging organizers for lightweight items like small bottles, condiment packets, and snack pouches.
These baskets work exceptionally well for storing items you access frequently but don’t need prime shelf real estate. Think of them as perfect homes for single serve drinks, cheese sticks, and small containers of leftovers.
Wire under shelf baskets allow air circulation while maximizing storage, helping maintain proper temperature throughout your fridge. We suggest choosing baskets with smooth edges to prevent scratching your shelves during installation and daily use.
Create a Designated Snack Station for Easy Access

Establishing a dedicated snack zone transforms how we access and consume food between meals. Smart snack organization reduces kitchen traffic and helps family members make healthier choices throughout the day.
Use a Clear Bin for Grab-and-Go Items
Clear bins serve as the foundation of an efficient snack station. We recommend investing in stackable clear containers that let us see exactly what’s available at a peek. Placing these transparent organizers on easily accessible shelves eliminates the need to search through multiple containers.
Grouping similar snacks together maximizes the effectiveness of our clear storage system. We can dedicate one bin to protein bars and nuts while using another for crackers and cookies. This approach reduces decision fatigue and speeds up snack selection during busy mornings or afternoon hunger pangs.
Strategic placement of grab-and-go bins saves valuable time during hectic schedules. We should position these containers at shoulder height where they’re most visible and accessible. Moving frequently consumed items to the front of each bin ensures we won’t overlook healthy options that might otherwise get buried behind less nutritious choices.
Keep Healthy Snacks at Eye Level
Eye level placement naturally guides us toward better food choices. We can position fresh fruit, vegetable sticks, and yogurt cups where they’re immediately visible when we open the fridge door. This simple adjustment makes nutritious options the default choice rather than an afterthought.
Visibility directly influences our eating habits throughout the week. We should store pre-cut vegetables like carrots and bell peppers in clear containers at eye level to encourage healthy snacking. Placing hummus and other healthy dips nearby creates convenient pairing opportunities that satisfy cravings while supporting our nutritional goals.
Strategic arrangement of wholesome snacks creates positive eating patterns for the entire household. We can reserve prime real estate for items like string cheese, hard-boiled eggs, and fresh berries. Moving less healthy processed snacks to lower shelves or less visible areas helps family members naturally gravitate toward more nutritious alternatives.
Organize Kids’ Snacks in Lower Drawers
Lower drawer organization puts healthy choices within children’s reach. We should designate exact drawers for kid-friendly snacks that they can access independently. Storing items like apple slices, cheese sticks, and individual yogurt containers at their height level promotes autonomy and reduces constant requests for help.
Child-accessible snack storage encourages independence while maintaining parental oversight. We can use divided organizers within lower drawers to separate different types of snacks. Creating sections for fruits, dairy items, and occasional treats helps children make balanced choices while learning about food categories.
Proper drawer organization teaches children responsibility for their own nutrition. We should label each section with pictures or simple words that young readers can understand. Keeping portion-controlled snacks in these accessible areas allows kids to serve themselves while preventing overconsumption of any single food type.
Optimize Door Storage for Frequently Used Items

Door storage compartments offer valuable real estate for organizing frequently accessed items while keeping interior shelves clear for larger foods.
Store Condiments and Sauces in Door Compartments
Condiments and sauces find their perfect home in door compartments where we can easily access them during meal preparation. Door storage naturally accommodates bottles of varying heights from ketchup and mustard to salad dressings and hot sauces. We recommend grouping similar condiments together, placing taller bottles toward the back and shorter ones in front for better visibility.
Temperature fluctuations in door storage work well for most condiments since they contain preservatives and acids that maintain stability. Organizing condiments by frequency of use helps streamline cooking routines, with everyday items like olive oil and vinegar positioned at eye level. This strategic placement frees up valuable shelf space for perishable items that require more stable temperatures.
Keep Beverages in Designated Door Slots
Beverages benefit from dedicated door slots that prevent overloading interior shelves while maintaining temperature consistency. We suggest reserving exact door compartments for different beverage types, creating zones for water bottles, juice cartons, and milk containers. Door storage works particularly well for beverages we consume regularly since frequent opening doesn’t significantly impact their quality.
Organizing beverages by size creates a more efficient system, with taller items like juice and milk claiming deeper door compartments. Smaller beverage containers like energy drinks and coffee creamers fit perfectly in upper door sections. This arrangement prevents bottles from falling when opening the door and makes inventory management simpler during grocery shopping.
Use Door Space for Small Jars and Bottles
Small jars and bottles maximize door storage potential by utilizing every available inch of compartment space. We recommend storing items like spice blends, hot sauces, and specialty vinegars in door areas where their compact size won’t interfere with larger items. Baby food jars, jam containers, and salad dressing bottles create perfect candidates for door organization.
Arranging small jars by height creates a tiered effect that improves visibility and accessibility. Items we use less frequently can occupy back rows while everyday essentials claim front positions. This system transforms door storage into an efficient pantry extension that keeps frequently used ingredients within easy reach during cooking.
Implement a First In, First Out System

Establishing a systematic approach to food rotation prevents waste and ensures we’re consuming items at their peak freshness. This proven method transforms how we manage our refrigerator inventory.
Rotate Older Items to the Front
Moving older items to the front of shelves creates a natural flow that prevents food from hiding and spoiling in the back corners. We should place newly purchased groceries behind existing items to maintain this rotation system. Dairy products like milk and yogurt benefit most from this approach since they have shorter shelf lives than many other refrigerated items. Fresh produce also requires consistent rotation to prevent vegetables from wilting and fruits from over-ripening. Weekly shopping trips become more efficient when we know exactly what’s available and what needs immediate attention.
Use Date Labels on Perishable Items
Labeling perishable items with storage dates eliminates guesswork and reduces the risk of consuming spoiled food. We can use removable stickers or masking tape to mark containers with the date items were opened or prepared. Leftovers should always include both the preparation date and contents description for quick identification. Pre-cooked meals and batch-prepared ingredients stay fresh longer when we track their storage timeline accurately. Clear date labels help family members make informed decisions about food safety without having to rely on visual inspection alone.
Check and Reorganize Weekly
Weekly fridge maintenance prevents small organization issues from becoming overwhelming problems that waste both time and money. We should schedule this task for the same day each week to establish a consistent routine that becomes second nature. Expired items get removed immediately, while foods nearing their expiration dates move to prominent positions for priority consumption. Fresh inventory assessment during weekly cleaning helps us plan meals around existing ingredients rather than buying duplicates. Temperature monitoring during these sessions ensures our refrigerator maintains optimal conditions at or below 40°F for food preservation.
Utilize Drawer Space for Fruits and Vegetables

We can maximize our fridge’s efficiency by transforming the often underutilized drawer compartments into specialized produce storage zones. These built-in drawers provide optimal humidity control that significantly extends the shelf life of our fresh fruits and vegetables.
Separate Fruits and Vegetables by Type
Creating distinct zones for different produce types revolutionizes how we store our fresh ingredients. We should designate separate areas based on each item’s exact storage requirements to prevent spoilage and maintain peak freshness.
Zone organization works best when we group similar items together rather than mixing different produce types randomly. Apples and pears require different storage conditions than leafy greens and carrots, so we’ll create dedicated sections for each category.
Strategic grouping makes meal preparation faster since we’ll instantly locate the ingredients we need. Berries, citrus fruits, and stone fruits can share one drawer section, while root vegetables, leafy greens, and herbs occupy another designated area.
Use Produce Storage Bags for Extended Freshness
Specialized storage bags dramatically improve how long our produce stays fresh and reduces food waste. We can choose from several types of breathable containers that maintain proper airflow while controlling moisture levels.
Breathable mesh bags work exceptionally well for items like onions, potatoes, and citrus fruits that need air circulation. These bags prevent moisture buildup that leads to premature spoilage and mold growth.
Ethylene gas absorbent bags specifically target fruits like apples and bananas that naturally release ripening gases. We’ll notice our fruit stays fresh up to three times longer when we use these specialized storage answers.
Perforated plastic bags offer the perfect balance between humidity retention and airflow for delicate items like berries and grapes. We can easily create our own by poking small holes in regular storage bags if specialized ones aren’t available.
Keep Ethylene-Producing Fruits Separate
Understanding which fruits produce ethylene gas helps us prevent our entire produce supply from ripening too quickly. We need to identify these natural gas producers and store them away from sensitive vegetables and other fruits.
High ethylene producers include apples, pears, avocados, bananas, and tomatoes that can cause nearby produce to ripen prematurely. We’ll create a separate storage area for these items to protect our other fresh ingredients.
Isolation strategy involves placing ethylene producers in sealed containers or dedicated drawer sections away from leafy greens and other sensitive vegetables. This simple separation technique can extend our produce’s freshness by several days.
Gas absorber packets provide an additional layer of protection when we can’t completely separate our produce. We can place these small sachets near ethylene producing fruits to neutralize the ripening gases before they affect other items.
Add Lazy Susans for Corner and Deep Shelf Access

Rotating organizers transform the most challenging refrigerator spaces into accessible storage areas. We’ll explore how these simple tools eliminate the frustration of reaching for items hidden in the back corners of our fridges.
Install Turntables for Condiments and Sauces
Condiment organization becomes effortless when we place turntables on our refrigerator shelves. Small lazy susans measuring 9 to 12 inches work perfectly for storing bottles of ketchup, mustard, salad dressings, and hot sauces in one convenient location.
Rotating access means we no longer need to move multiple bottles to reach the barbecue sauce hiding in the back. Position these turntables on middle shelves where condiments stay at optimal temperatures, and group similar items together like Asian sauces, salad dressings, and sandwich spreads.
Easy identification happens when we arrange bottles by height, placing taller items like ranch dressing toward the center and shorter jars like jam around the edges. This creates a visual hierarchy that makes meal preparation faster and more efficient.
Use Lazy Susans in Deep Refrigerator Compartments
Deep shelf storage challenges disappear when we install lazy susans in the hardest to reach areas of our refrigerators. Corner spaces and back sections become fully accessible with a simple spin, eliminating the need to remove items to reach what’s behind them.
Large lazy susans measuring 12 to 16 inches accommodate bigger items like yogurt containers, soup cartons, and leftover storage containers. We can maximize these deep compartments by creating two levels of storage, with shorter items on the turntable and taller items surrounding it.
Strategic placement works best when we position lazy susans in areas where we store frequently used items that tend to migrate toward the back. Bottom shelves often benefit most from this organization method since they’re typically the deepest and hardest to access.
Choose Appropriately Sized Rotating Organizers
Size selection determines the success of our lazy susan organization system. We need to measure our refrigerator compartments carefully before purchasing rotating organizers to ensure they fit properly and spin freely without hitting walls or other items.
Standard refrigerator lazy susans come in three main sizes: 9 inch diameter for compact spaces and condiment storage, 12 inch diameter for medium shelves and mixed items, and 16 inch diameter for large compartments and bulk storage needs.
Clearance requirements mean we should leave at least 1 inch of space around the lazy susan’s circumference to allow smooth rotation. Non slip surfaces prevent items from sliding during rotation, while raised edges contain spills and keep smaller bottles secure during movement.
Maintain Your Organized Fridge System

Sustaining our newly organized refrigerator requires consistent effort and smart maintenance strategies. We’ll establish routines that keep our system working effectively over time.
Schedule Weekly Cleanouts and Reorganization
Weekly cleanouts prevent our organized system from deteriorating into chaos. We should designate a exact day each week to remove expired items and wipe down surfaces, which maintains hygiene and prevents bacterial growth. During these sessions, we’ll check expiration dates on all perishables and move items nearing their use-by dates to the front for immediate consumption.
Regular surface cleaning becomes essential for maintaining our organization zones. We need to wipe down shelves, drawers, and door compartments with warm soapy water to eliminate spills and sticky residues. Checking our storage bins and containers weekly ensures they remain clean and functional for optimal food preservation.
Reorganizing displaced items during these weekly sessions keeps our zones intact. We should return misplaced products to their designated areas and assess whether our current system still meets our household’s needs.
Involve Family Members in the System
Family involvement transforms fridge organization from a solo task into a shared responsibility. We can assign exact zones to different family members, making each person accountable for maintaining their designated area. Creating clear labels for each zone helps everyone understand where items belong and reduces confusion during busy meal times.
Teaching children about our organization system develops their independence and responsibility skills. We should explain why dairy products stay in exact areas and demonstrate how to properly store leftovers in labeled containers. Kids can take ownership of organizing their snack station while learning valuable life skills.
Setting family roles ensures our system remains consistent across all household members. We might designate one person as the weekly cleanout coordinator while others focus on restocking and rotating items using our FIFO system.
Adjust Organization as Needs Change
Flexibility keeps our fridge organization relevant as our household evolves. We should periodically reassess our current system to determine if our zones still match our eating habits and family size. Seasonal changes often require adjustments to accommodate different types of produce and holiday meal preparations.
Growing families need expanded storage answers while empty nesters might benefit from consolidating zones. We can modify our container sizes and shelf arrangements to better serve our current lifestyle and food purchasing patterns.
Monitoring which areas become cluttered most frequently reveals where our system needs improvement. We’ll adapt our organization strategy based on these observations, perhaps adding more storage bins or reorganizing frequently accessed items for better accessibility.
Conclusion
We’ve equipped you with proven strategies to transform your chaotic refrigerator into an organized food storage powerhouse. These techniques work whether you’re dealing with a compact apartment fridge or a spacious family-sized unit.
Remember that successful fridge organization isn’t about perfection – it’s about creating systems that work for your lifestyle. Start with one or two strategies that resonate most with your needs and gradually build from there.
Your organized fridge will save you money reduce food waste and make meal preparation significantly easier. The time you invest in setting up these systems will pay dividends every time you open that door and find exactly what you’re looking for.
Frequently Asked Questions
How often should I clean and organize my refrigerator?
You should perform a deep clean and organization session monthly, with weekly maintenance checks. Schedule weekly cleanouts to remove expired items and wipe down surfaces. This routine helps maintain hygiene, prevents bacterial growth, and keeps your organization system effective. Regular maintenance prevents clutter from building up and ensures your fridge stays efficient.
What are the best containers for refrigerator organization?
Clear, stackable containers with airtight seals are ideal for fridge organization. Choose containers with silicone gasket lids for optimal freshness preservation. Use different sizes for various food items and ensure they’re transparent for easy identification. Label each container with contents and dates to track freshness and prevent waste.
How should I organize food by categories in my fridge?
Divide your refrigerator into five main zones: dairy, meats, fruits, vegetables, and leftovers. Store temperature-sensitive items like milk and eggs on middle shelves. Keep raw meats on the bottom shelf to prevent cross-contamination. Store fruits and vegetables in designated crisper drawers with appropriate humidity settings for optimal freshness.
What is the FIFO system and why is it important?
FIFO stands for “First In, First Out” – a rotation system that prevents food waste. Place older items at the front of shelves and new purchases behind them. This ensures you use items before they expire, maintaining peak freshness and reducing waste. Use date labels on perishable items to eliminate guesswork about expiration dates.
How can I maximize vertical space in my refrigerator?
Use shelf risers to create double-decker storage, stackable drawer organizers for customizable compartments, and under-shelf baskets to utilize space beneath existing shelves. These solutions transform cramped refrigerators into spacious storage systems while maintaining easy access to all items and improving overall organization efficiency.
Where should I store different types of food for optimal freshness?
Store dairy products on main shelves or doors depending on temperature sensitivity. Keep raw meats on the bottom shelf to prevent drips. Use crisper drawers for fruits and vegetables, separating them by type. Store leftovers in clear containers on easily accessible shelves. Keep frequently used condiments in door compartments for convenience.
How do I prevent fruits and vegetables from spoiling quickly?
Separate fruits and vegetables by type to prevent cross-contamination. Use specialized produce storage bags – breathable mesh bags for items needing air circulation and ethylene gas absorbent bags for fruits that release ripening gases. Keep ethylene-producing fruits separate from sensitive vegetables to prolong overall freshness.
What should I do with expired or soon-to-expire items?
During cleanouts, sort items into three categories: keep, toss, and donate. Discard expired items immediately for food safety. Prioritize soon-to-expire items for immediate use in meals. Donate unopened, non-expired items you won’t use. This process prevents waste and creates space for better organization.
How can I create an effective snack station in my fridge?
Use clear bins for grab-and-go items and group similar snacks together. Place bins at shoulder height for maximum visibility. Keep healthy snacks at eye level to encourage better food choices. Organize kids’ snacks in lower drawers to promote independence and make it easier for them to find their preferred items.
What maintenance strategies help keep my fridge organized long-term?
Schedule weekly cleanouts, involve family members with designated zones, and remain flexible to adapt to changing needs. Monitor cluttered areas and adjust storage solutions accordingly. Periodically reassess your organization system to ensure it continues meeting your household’s evolving eating habits and storage requirements for sustained effectiveness.