Are your walls feeling a bit bare? If you’re looking for a way to add character and elegance to your home, you’ve come to the right place. This post dives into the world of picture frame molding ideas, offering you a fresh perspective on wall decor. With the right molding, you can create polished and elegant finishes that elevate any space.
Whether you’re a seasoned DIY enthusiast or just starting out, this guide is tailored for you. If you love transforming small spaces into stylish havens, these moldings are the perfect solution. You’ll find that even a little change can make a big difference in how a room feels.
In this post, I’ve gathered 12 unique picture frame molding ideas that are not only easy to implement but also add a touch of sophistication to your walls. From classic white panels to geometric designs and even rustic wood options, you’ll discover a variety of styles that cater to different tastes and themes. Each idea is designed to inspire your creativity and help you craft a space that feels uniquely yours.
Along the way, you’ll also learn about various molding styles that fit different aesthetics, from contemporary to vintage. You’ll gain practical tips on how to incorporate these ideas into your home, regardless of your design experience.
So grab your tools and get ready to transform those bare walls into stunning focal points. Your journey to elegant wall finishes begins here!
Key Takeaways
– Discover 12 unique picture frame molding ideas that can elevate your home decor instantly.
– Explore styles ranging from classic white panels to quirky geometric designs.
– Find easy DIY tips that make adding molding to your small space both simple and achievable.
– Learn how to mix and match different molding styles for a personalized touch.
– Get inspired by elegant wall finishes that reflect your personal style and taste.
1. Classic White Panels for Timeless Elegance

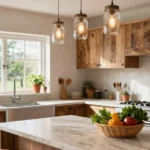
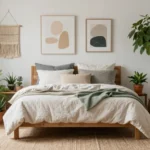
You lean into a timeless palette with classic white panels. Clean, wide molding frames create subtle depth and polish. This look works in small spaces because it feels light yet refined, never loud. Try pairing white panels with soft gray walls or muted wallpaper to let the texture sing.
Keep lines crisp by caulking joints and keeping the surface dust-free. If budget is tight, use pre-primed MDF or pine and paint it yourself. This approach ties into timeless trends that feel calm and versatile, delivering emotional calm in daily spaces.
– Pair white paneling with soft gray walls for balance.
– Install panel heights at knee and eye level for impact.
– Use satin finish to enhance subtle sheen and depth.
– Incorporate above-panel trim with caulked joints for precision.
This timeless approach stays fresh, with texture and light playing softly to refine the room’s character.
Ever notice how small spaces feel instantly calmer with crisp white panels? These picture frame molding ideas use classic white panels to add subtle depth without shouting, and they’re budget-friendly when you choose pre-primed MDF or pine. Keep joints caulked and walls dust-free for lasting polish.
Classic White Panels for Timeless Elegance
Editor’s Choice
Price updated on December 10, 2025 at 7:32 PM

Ekena Millwork PNL20X20AS-01 20″W x 20″H x 1/2″P Ashford Molded Classic …

KASARO Pre-Cut Wall Molding Kit, Wainscoting Ready to Assemble 3D Panel …

Art3d Wall Molding Trim – 4-Pack MDF Wainscoting Panels, Paintable & War…

6-Frame Premade Accent Wall Molding Kit, Ready-to-Assemble Wainscoting P…

Ekena Millwork PNL16X20AS-02 16″W x 20″H x 1/2″P Ashford Molded Scallope…
2. Geometric Frame Designs for Contemporary Appeal

Geometric frame designs bring a crisp, contemporary edge to your walls. Angular molding creates patterns that feel sharp yet approachable. In small spaces, these shapes draw the eye upward, adding height. Use bold colors or high-contrast finishes to make the geometry pop.
Plan with painter’s tape to map shapes before nailing, and keep costs down by using affordable MDF or pine with varied sizes for energy. This trend fits gallery-inspired homes that feel confident and modern.
– Pair angular moldings with dark wall colors for bold contrast.
– Install painter’s tape to guide the design before attaching molding.
– Mix molding sizes to create dynamic geometry and depth.
– DIY: cut corners at 45 degrees for accuracy.
Geometric frames energize rooms while keeping lines clean and fresh.
Geometric Frame Designs for Contemporary Appeal
Editor’s Choice
Price updated on December 10, 2025 at 7:31 PM

Art3d Premade Bilinear Frame Accent Molding Set, Pre-Cut Decorative Wain…

Ready to Assemble Wall Molding Kit Corners Made into 1 Top and 1 Bottom …
6-Frame Premade Accent Wall Molding Kit, Ready-to-Assemble Wainscoting P…

Rossny Wall Molding Panels Kit, 6-Pack Pre-Cut Wainscoting Trim for Acce…
Art3d Wall Molding Trim – 4-Pack MDF Wainscoting Panels, Paintable & War…
3. Vintage Crown Molding for Chic Charm

Vintage crown molding brings classic charm to any space. It works beautifully in rooms with high ceilings, adding presence without overwhelming the decor. Choose ornate profiles for drama, or simple styles for subtle elegance. Pairing crown molding with soft pastels creates a dreamy mood, while bold hues offer a modern twist.
Dust regularly to keep the vintage look crisp. If you want a budget-friendly route, opt for a simple profile or a pre-finished option. Consider layering crown molding for extra character, and cut corners at 45 degrees for tight fits.
– Pair ornate profiles with soft, airy color palettes.
– Install shadowed ledges for display within crown molding.
– Paint the same as walls for seamless ceiling line.
– DIY: cut corners at 45 degrees for accuracy.
This approach lends timeless grace, while the textures of wood add warmth.
Vintage Crown Molding for Chic Charm
Editor’s Choice
Price updated on December 10, 2025 at 7:31 PM

Endurathane Running Rose Crown Moulding, 1 7/8″H x 2″P x 2 7/8″F x 94 1/…

Endurathane Dentil Crown Moulding, 4 3/8″H x 3 1/2″P x 5 5/8″F x 94 1/2″…

EWCR11 Colonial Crown Moulding Trim, 3/4″ x 2-5/8″, Maple, 94″

EWCR13 Colonial Crown Moulding Trim, 3/4″ x 4-5/8″, Maple, 94″

Orac Decor CX176 | Duropolymer High Impact Polystyrene Crown Moulding | …
4. Rustic Wood Molding for Country Vibes

Rustic wood molding brings warmth and a touch of countryside charm. Reclaimed or knotty pine adds texture that feels lived-in yet refined. Pair it with neutral walls to let the grain shine. This look is cozy, inviting, and grounded in nature.
For budget-friendly charm, mix new trim with reclaimed scraps and seal with a clear varnish to protect the grain. Keep some natural imperfections for authenticity, and consider a wainscot look by layering wood with paint or wallpaper.
– Pair reclaimed wood with neutral walls to soften.
– Install varnish to protect grain’s character over time.
– Use horizontal planks for a wainscot look in cozy spaces.
– DIY: vary thickness for textural charm and warmth.
The result feels warm and welcoming, with texture enhancing the design.
Did you know rustic wood molding can boost cozy vibes by up to 40% in a small space? Mix new trim with reclaimed scraps for a budget-friendly country chic, then seal the grain with a clear varnish. It’s a simple, tactile upgrade that elevates your picture frame molding ideas.
Rustic Wood Molding for Country Vibes
Editor’s Choice
Price updated on December 10, 2025 at 7:31 PM

Rockin’ Wood Real Wood Nail Up Application Rustic Reclaimed Naturally We…

BARNWOODUSA Real Reclaimed Wood Planks – Easy Nail-Up Shiplap Panels for…

Rustic Farmhouse Reclaimed Barn Wood Bundle | 36 inch | Wood Plank | Wal…

Luxdecor Real Reclaimed Wood Planks for Wall-10 Pieces Easy Nail-Up Ship…

Vintage Harvest Reclaimed Barn Wood Wall Planks – Naturally Weathered, R…
5. Color-Blocked Molding for Bold Statements

Color-blocking with molding brings a bold, modern edge to walls. This approach adds personality to small spaces without overwhelming the room. Contrast sections of wall with crisp molding borders to create a playful, contemporary focal point. This trend pairs well with thoughtful decor to feel vibrant yet balanced.
Keep lines clean with careful tape work and a consistent color plan. If you’re unsure, start with a single block and expand later. A cohesive palette helps the blocks feel intentional rather than busy.
– Pair molding color with one wall hue.
– Install precise painter’s tape for clean edges everywhere.
– Use triangles or rectangles within panels for added flair.
– DIY: prime, base coat, then color blocks on wall.
This approach energizes walls with personality and depth.
Color-Blocked Molding for Bold Statements
Editor’s Choice
Price updated on December 10, 2025 at 7:32 PM

ScotchBlue Original Multi-Surface Painters Tape, 2 Inch Wide (1.88 In. x…

Blue Painters Tape 1 Inch Bulk – Paint Tape 20 Rolls x 1 Inch x 55 Yards…

ScotchBlue Painter’s Tape, 0.94″ Width x 60 Yards, 8 Rolls, Blue, Multi-…

Art3d Pre-Cut Wall Molding Set of 6 pcs, Ready-to-Assemble Wainscoting P…

20FTx1.6IN Peel and Stick Wall Molding Trim,Flexible Molding Trim Self A…
6. Decorative Molding for Personal Touch

Decorative molding lets your space speak your style. Frame a central focal point with art or a mirror to highlight it and add a custom feel. Choose intricate designs or simpler options that echo your taste. This small touch can customize any room with character.
Mix different moldings for a layered look, and anchor heavier pieces with hardware to keep them secure. You can add lighting inside decorative frames to boost drama. Paint the moldings to match or contrast with your focal piece for cohesion.
– Pair varied moldings around a central focal point with central focal point.
– Install anchors for heavy frames to stay secure.
– Incorporate lighting within frames for glow and depth.
– DIY: paint moldings to mirror your art collection.
This personal touch makes spaces feel curated and warm.
Decorative Molding for Personal Touch
Editor’s Choice
Price updated on December 10, 2025 at 7:32 PM

PALMPOP Peel and Stick Wall Molding Kit of 6 Frames,Premade Accent Wains…
Art3d Premade Bilinear Frame Accent Molding Set, Pre-Cut Decorative Wain…

3 Set Accent Peel and Stick Wall Molding Kit Premade Wainscoting Panels …

3 Set Arch Wall Molding Kit Peel and Stick Arch Premade Accent Wainscoti…

Pangda Corner Wall Molding French Style Wainscoting Panels Flora Mouldin…
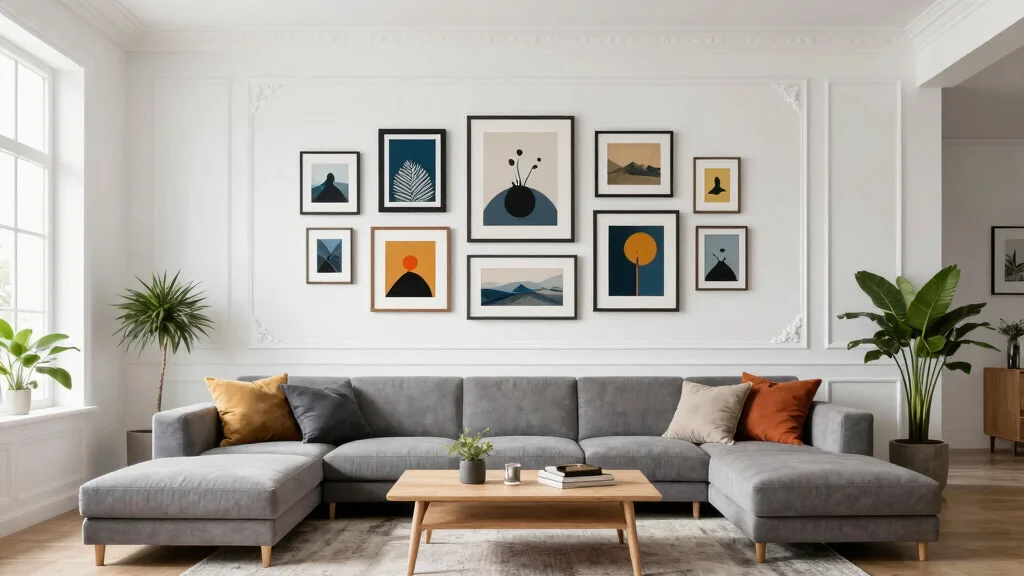
7. Multi-Frame Molding for Gallery Style

A gallery wall made with multi-frame molding turns a plain wall into an art collection. It works best in small spaces where you want visual interest without overpowering the room. A mix of frame sizes and styles creates a deliberate, curated vibe that still feels welcoming.
Lay out the frames on the floor to test balance before hanging, and use hooks for easy adjustments. You can add shelves for small art or plants within the grid for extra life. Build the grid with molding, then hang frames inside for a clean gallery look.
– Pair matched frames with a grid layout on wall.
– Lay out frames on floor before hanging.
– Incorporate slim shelves for mini art pieces.
– DIY: attach molding grid then hang frames.
The result feels curated yet effortless.
Fun fact: a balanced grid of 3–5 frames can visually widen a small wall by up to 25%. With picture frame molding ideas, mix sizes and styles to create a gallery vibe that’s curated yet welcoming. Test layout on the floor before hanging to lock in balance.
Multi-Frame Molding for Gallery Style
Editor’s Choice
Price updated on December 10, 2025 at 7:32 PM

Wall molding kit Set pre-Cut, Ready to Assemble, Glue Installed | 3 Top …

Wall Molding Kit, Premade Wainscoting Panels, Picture Frame Moulding, Pr…

COUKIU 6 Sets Pre-Cut Wall Molding kit,Ready to Assemble Accent Molding …

Ready to Assemble Wall Molding Kit Set, Pre-Cut Design, Installed with G…

3-Frame 20″ x 20″ Premade Accent Wall Molding Kit, Ready-to-Assemble Wai…
8. Minimalist Molding for a Sleek Look

Minimalist molding creates a sleek backdrop that lets fewer details shine. Thin lines and tidy edges let modern decor breathe, especially in small rooms. This approach keeps spaces airy while adding a touch of refinement and structure.
Stick to a monochrome palette to preserve calm, and use a laser level to nail precise alignment. A subtle metallic finish can offer an unexpected twist. Measure, cut, and install with care for a flush, invisible seam.
– Pair thin strips with a monochrome backdrop.
– Install laser level for precision.
– Use metallic finishes for subtle twist.
– DIY: cut accurately, install flush, then caulk for finish.
Clean lines make spaces feel calm and expansive.
Minimalist Molding for a Sleek Look
Editor’s Choice
Price updated on December 10, 2025 at 7:32 PM

NeatiEase 4 Set Peel and Stick Wall Molding Trim Kit, 20″ x20″ Premade W…

Art3d 30Ft Flexible Peel and Stick Crown Molding Trim, Self-Adhesive Pan…

Precut Wall Molding Kit – Paintable Wainscoting Panels Ready-to-Assemble…

BOSCH GLL50-20G 50 Ft Green-Beam Self-Leveling Cross-Line Laser, Include…

ALEX PLUS CAULK CONTRACTOR PACK WHITE 10.1 FL.OZ (Pack of 12)
9. Textured Molding for Depth

Textured molding adds depth and character to walls, great for small spaces needing personality. Raised patterns, waves, or stripes create a tactile experience that catches the eye. Pair neutral colors with texture to draw attention without shouting.
Enhance texture with a matte paint to increase contrast, and use sturdy adhesive for a strong hold. Mix textures in the same room for richer interest, then paint when dry to finish the look.
– Pair raised textures with soft neutrals for balance.
– Paint with matte finish to highlight texture subtly.
– Combine two textures in different sections for contrast.
– DIY: choose plaster or pre-made textures and paint.
Texture adds depth that makes walls feel tactile.
Textured Molding for Depth
Editor’s Choice
Price updated on December 10, 2025 at 7:32 PM

Art3d Fluted Wood Panel for Wall and Ceiling, Beaded Accent molding for …

Art3d Premade Board and Batten Paintable Wainscoting Kit, MDF Accent Wal…

Pangda Peel and Stick Wall Molding Kit, 3D Premade Accent Molding Wainsc…

NeatiEase Peel and Stick Wall Molding Kit 6-Frame Premade, Ready-to-Asse…
20FTx1.6IN Peel and Stick Wall Molding Trim,Flexible Molding Trim Self A…
10. Elegant Baseboard Molding for a Refined Finish

Baseboard molding anchors the room with a polished edge. In small spaces, taller baseboards can create the illusion of height and a refined finish. Choose profiles that match your style, from sleek modern to ornate traditional.
Contrast baseboards with a lighter wall color to emphasize their silhouette. Ensure they are level and secure to avoid gaps, and consider taller profiles for drama in cozy rooms. Measure, cut, and attach with nails or adhesive for a clean line.
– Pair tall baseboards with light wall color contrast.
– Install level lines to avoid gaps and squeaks.
– Use curved profiles for traditional elegance in small rooms.
– DIY: cut to height, secure with nails and seal.
A strong base sets the room’s tone.
Elegant Baseboard Molding for a Refined Finish
Editor’s Choice
Price updated on December 10, 2025 at 7:33 PM

Wall Baseboard Molding Trim,8-Pack of 48 x 3.27 Inch,Peel and Stick High…

Art3d Wall Baseboard Molding Trim 8-Pack of 56 x 3.2 in., High Impact Po…

Wall Base Molding Trim Peel and Stick Rubber Baseboard Moulding 4” Wide …

Sunnyglade 10-Pack Wall Baseboard Molding Trim of 44.5 x 3.2 in, High Im…

Flexible Baseboard Molding Trim 3 Inch(W) x 40 Feet(L) Self Adhesive Vin…
11. Shadow Box Molding for Artistic Flair

Shadow box molding brings a playful, artistic edge to walls. It creates a three-dimensional frame that makes displays pop, turning the wall into a mini gallery. Use color contrasts to make the boxes stand out and control the depth of each shadow.
Leave space between molding and wall to create the shadow effect, and stack boxes at different heights for visual rhythm. Cut and assemble the shadow boxes, then fix them securely and fill with your favorite pieces.
– Pair shadow boxes with art collections for impact.
– Install spacing to create distinct shadows on walls.
– Stack boxes at varied heights for interest.
– DIY: cut, assemble, and fix frames securely to wall.
Shadow boxes turn any wall into a tiny gallery.
Shadow Box Molding for Artistic Flair
Editor’s Choice
Price updated on December 10, 2025 at 7:33 PM

Americanflat 11×14 Shadow Box Frame with Shatter-Resistant Glass – Silho…

Americanflat 12×16 Shadow Box Frame with Polished Plexiglass – Silhouett…

Large Shadow Box 16×20 Black Frame with UV Protection | 2 Background Opt…

FrameWorks 8.5×11 Deep Shadow Box Frame, Wooden Display Case w. Linen Bo…

4 Pack 8″x 10″ Shadow Boxes Frame Display Cases Wood Deep Shadowbox for …
12. Mixed Molding Styles for Eclectic Vibes

Your space can breathe with mixed molding styles. Combining different shapes and sizes adds personality while keeping a cohesive theme. This approach works well in smaller rooms, letting you express yourself without chaos.
Plan layouts to avoid clutter and maintain a clear rhythm. Stick to a shared color backbone to harmonize the mix. Mix traditional and modern moldings thoughtfully for balance, and choose pieces you love to cut to fit.
– Pair varied styles with a shared color backbone.
– Plan layout to avoid visual clutter in small rooms.
– Mix traditional and modern moldings thoughtfully for balance.
– DIY: select pieces you love, cut to fit.
A thoughtful blend creates character without chaos.
Mixed Molding Styles for Eclectic Vibes
Editor’s Choice
Price updated on December 10, 2025 at 7:33 PM

3 Set Accent Wall Molding Kit Premade Wainscoting Panels Wall Molding Pe…

Art3d Pre-Cut Wall Molding Set of 6 pcs, Ready-to-Assemble Wainscoting P…
Art3d Premade Bilinear Frame Accent Molding Set, Pre-Cut Decorative Wain…

COUKIU Pre-Cut 3 Set Peel and Stick Wall Molding Trim Kit, 12″ x24″ Prem…

NeatiEase 4 Set Peel and Stick Wall Molding Trim Kit, 16″ x24″ Premade W…
Conclusion

From classic designs to modern twists, picture frame molding can truly elevate your small space.
These 12 ideas showcase the versatility and beauty of molding, allowing you to express your style effortlessly. Whether you prefer clean lines or intricate patterns, there’s a molding idea for every taste. Dive into DIY projects, and watch as your walls transform into elegant canvases full of personality!
Note: We aim to provide accurate product links, but some may occasionally expire or become unavailable. If this happens, please search directly on Amazon for the product or a suitable alternative.
This post contains Amazon affiliate links, meaning we may earn a small commission if you purchase through our links, at no extra cost to you.
Frequently Asked Questions
What are some simple picture frame molding ideas for small spaces?
Small spaces benefit from clean, scaled-down molding that adds depth without crowding. Try a single, narrow frame around a piece of art or a mirror to create a polished focal point using picture frame molding ideas. Add a shallow inset or a second, lighter inner frame to mimic elegant wall finishes without shrinking the room.
Practical tips: measure accurately, choose lightweight materials (like foam or thin wood), and keep gaps around 1/2 in to 1 in. Use a level and painter’s tape to align corners, pre-paint the molding, then install with a glue-and-nail approach for a clean, durable finish. This approach makes a big impact in small spaces.
How can I install picture frame molding in a small room on a budget?
Plan a simple grid or one-frame layout that fits your space. Choose budget-friendly molding like MDF or foam to keep costs down. Cut with a miter saw for clean corners, join with wood glue and finishing nails, and fill seams with caulk. Pre-paint the molding before installation for a smoother final look. This DIY picture frames project pairs well with wall decor ideas and interior design inspiration while staying friendly to your budget.
Pro tip: use spacers to maintain consistent gaps and consider lightweight materials to simplify handling in tight areas.
What molding styles create an elegant wall finish in tight spaces?
For small rooms, choose styles that read as refined but not heavy. Try picture frame molding with shallow panels, beadboard accents for texture, or a tight grid of framed sections. Keep gaps modest and consider painting the molding the same color as the wall for a seamless, elegant wall finish, or use a contrasting shade for a more defined look. Mix in a couple of profiles (flat + beveled) sparingly to maintain a clean, sophisticated vibe that supports interior design inspiration without overpowering the room.
What tools and materials do I need for DIY picture frame molding in small spaces?
Gather essentials: measuring tape, a miter saw (or miter box), level, hammer or nail gun, finishing nails, wood glue, caulk, sandpaper, primer, and paint. Materials: molding (wood, MDF, or foam), optional corner blocks, painter’s tape, and wood filler. For tight spaces, foam or lightweight wood molds are easier to manage. Paint in advance to speed up installation and ensure a crisp, professional finish for your picture frame molding ideas.
How should I plan the layout to maximize impact without crowding a wall?
Start by measuring the wall and deciding on a focal point (art, mirror, or a central panel). Sketch a few layout options or use painter’s tape to map the frames on the wall before cutting. Aim for consistent gaps (think 1/2 inch to 1 inch) or a centered grid that feels balanced. Align the molding with existing architectural features (ceiling line or door frames) to create cohesion. Visualize with paper cutouts first to ensure your picture frame molding ideas translate into an elegant wall finish rather than clutter.
Related Topics
home decor
picture frame molding
DIY projects
small spaces
elegant finishes
interior design
budget friendly
molding styles
wall decor ideas
advanced DIY
modern aesthetics
quick transformations